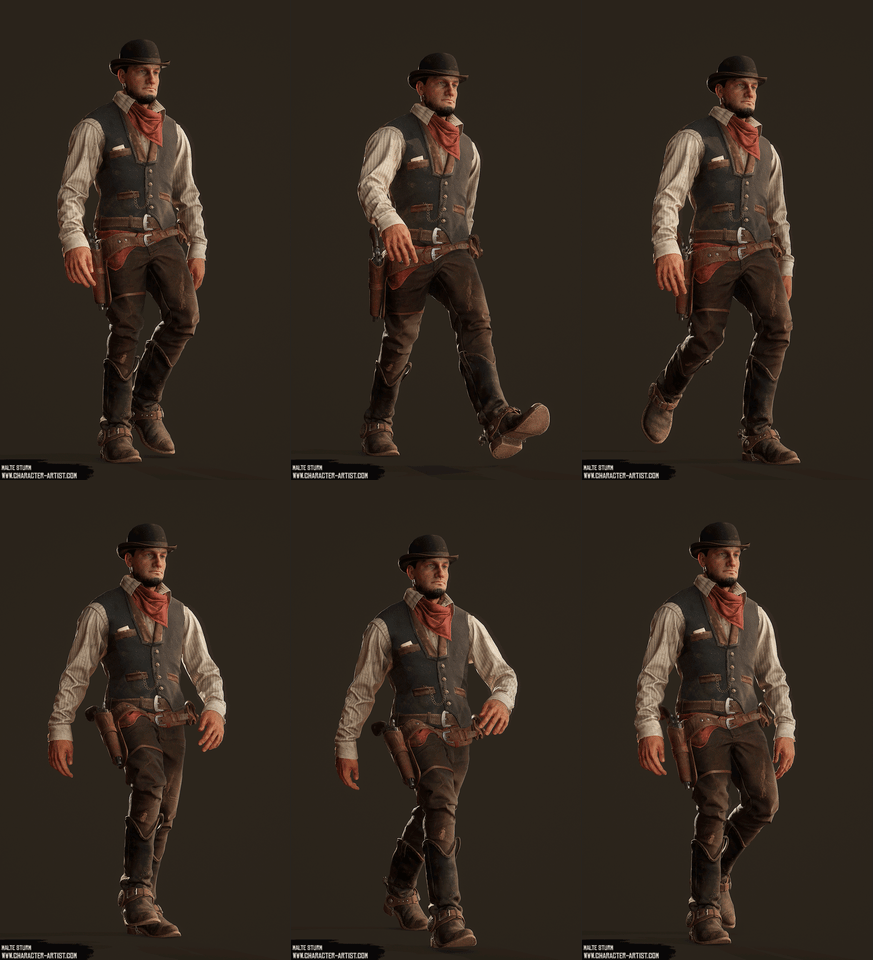
Malte Sturm did a detailed breakdown of his western self-portrait created with several tools and animated with Mixamo, and shared helpful information about texturing and face sculpting he has learned from personal experience.
Introduction
My name is Malte Sturm. I live in Hamburg, Germany and work as 3D Artist at a video-game company. My job there includes creating a wide variety of assets, but mostly spaceships. My next goal is to work as Character artist for games. Like many of you, I started with 3D because I was in awe of games like Morrowind and countless others. Immersion has always been a big part of the fascination I had for games and 3D was a way for me to put all that into something I created on my own.
Wild West Self-Portrait
Idea
I have a strong interest in historical settings for as long as I can think – wild west in particular.
The German author Karl May and his stories of Winnetou and Old Shatterhand are probably to blame for that. When Red Dead Redemption 2 appeared on the horizon, I thought about a way to do something with that tremendous anticipation I had.
Also, I wanted the next project to reflect my love for immersive video games – a reminder for myself why I started working in the industry and where I want to go in the future.
At that time I had done several anatomy studies and finished several courses and wanted to put all the gained knowledge into practice.
All these goals led to a real-time wild west self-portrait.
References
My main references were TV shows like Hell on Wheels, Deadwood and Godless, Classical Western movies like Tombstone, etc. and of course screenshots of RDR2. Paintings from Mark Maggiori, endless Pinterest boards for things like holsters, etc. and the YouTube channel of Hickok45 for research on old weapons proved to be helpful, too. Really digging deep and absorbing every information I can get is part of the fun for me. Sometimes I had to contain myself when I ended up watching videos about the functionality of a revolver or Winchester rifle for hours. But in the end, I think the project benefited from that. For projects like this, I like to also look for references outside the usual web bubble, so I bought a few books about wild west clothing and life back then.
I wanted to imagine what I would look like if I had lived in the golden age of the wild west.
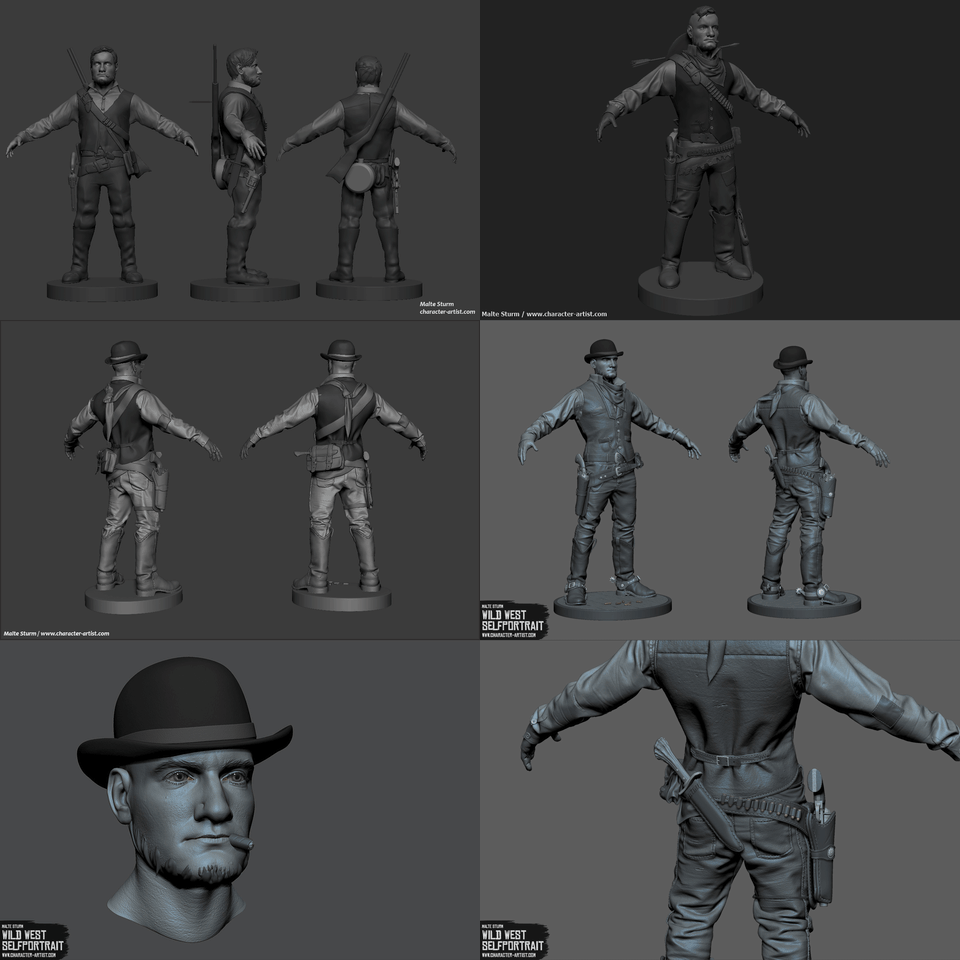
As you can see in the gif below, the concept evolved a little bit over time. As did the quality – It was the toughest project I have ever done so far. The first results were so far away from the quality I had in mind, that I decided to not stop until I get a lot closer to the quality-level I had imagined. By looking at the images below, one can hopefully see some progress between the different iterations.
It took many months of hard work and lots of iterations to get something I was somewhat satisfied with:
First Steps
I would like to avoid repeating technical tips that have been told many times by far more experienced artists than me. Instead, I want to give you a short overview, share personal learnings made during the course of this project and highlight some resources.
Starting with rough blockouts and simple placeholder objects of my first ideas in ZBrush I could see what works well and in which direction I want to work. I also made screenshots and overpainted them for quick iterations on the idea. Once I had decided on a rough setup, I worked on it piece by piece and replaced the placeholders when I had a new asset ready. It didn’t have to be set in stone, but this approach made sure things work well together later on (e.g. Folds, belt).
Face Sculpt in ZBrush
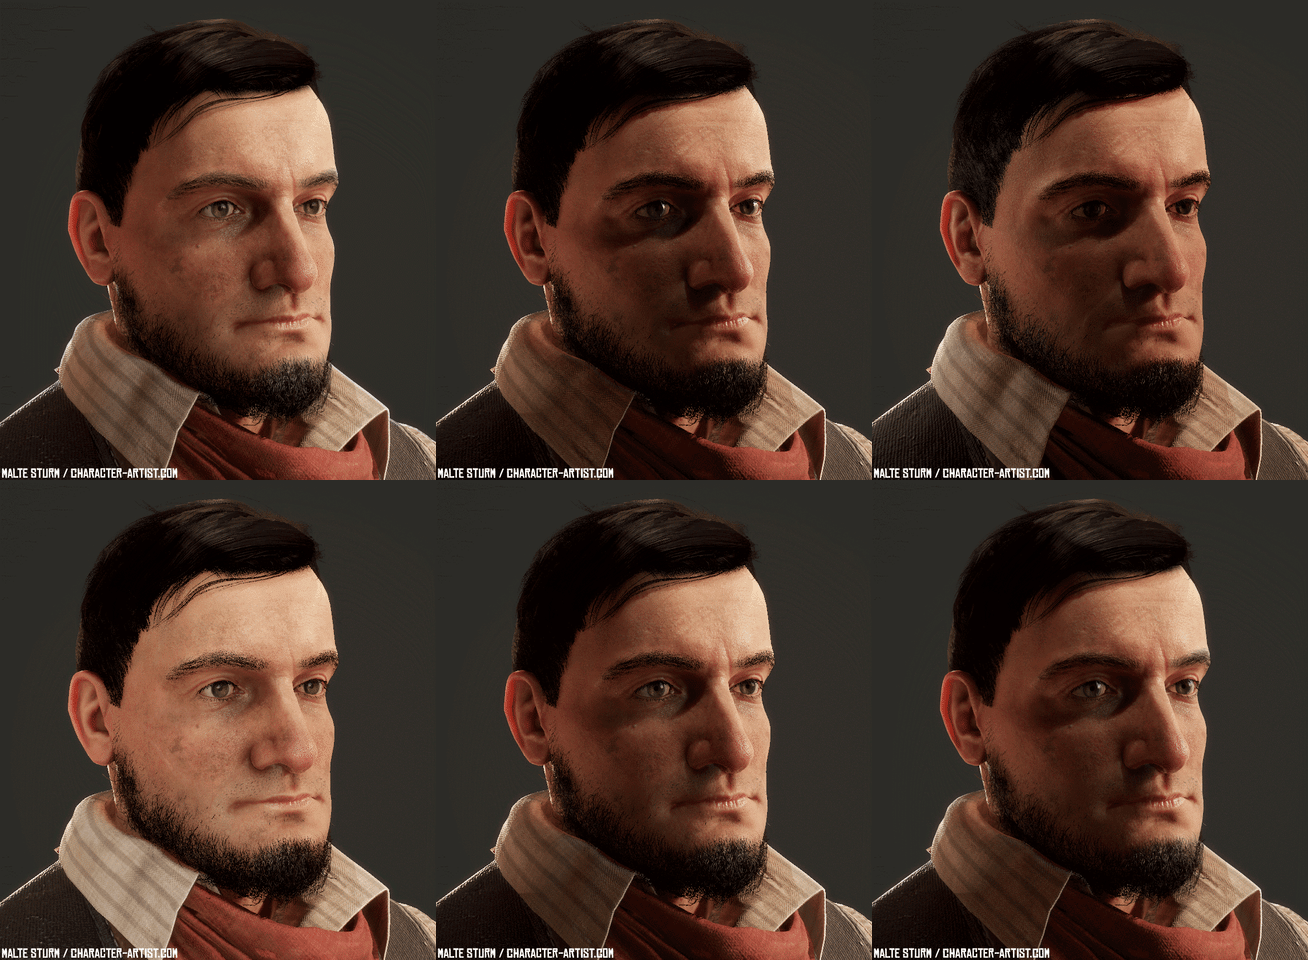
The face was sculpted entirely in ZBrush from a sphere. No special tricks, just a lot of iterations, feedback, and anatomy. But here are a few personal learnings that might be helpful for some people:
- Insert actual eyes as soon as possible. Just take 2 spheres and quickly paint on them. It helps a lot to identify areas that need improvement. We as humans are very good at recognizing faces and what might be wrong with them, so the more human the head looks in the beginning, the better. Same goes for hair. A quick blob mesh will do. Also, coloring the lips, eye, and hair helps a lot and makes the process even more fun.
- Get a makeup mirror and put it next to your workstation. I think it’s just as essential as a good reference. All sorts of sculpts can benefit from that. Sometimes a quick glance in the mirror is better than comparing your sculpt to 2D reference images because it’s a little more like sculpting from life. I also noticed that by using a mirror, I trained myself to look for interesting features in the face (while brushing my teeth in the morning, for example) or on stranger’s faces in the train.
- Fresh eyes and feedback! It’s crazy how much it helps to get away for some hours (or even days) and get back to your work later. I already knew that, but this project showed me the importance like no other before. I noticed many mistakes I didn’t see previously… Feedback can be a little trickier since it has the potential to distract you from your original goal. But I try to handle it like a spyglass. It gives me the opportunity to see my work through the eyes of a completely different viewer. So even when it evokes negative feelings (which feedback does sometimes – it’s normal), I just use it to observe my work through somebody else’s eyes and make my own conclusions from that.
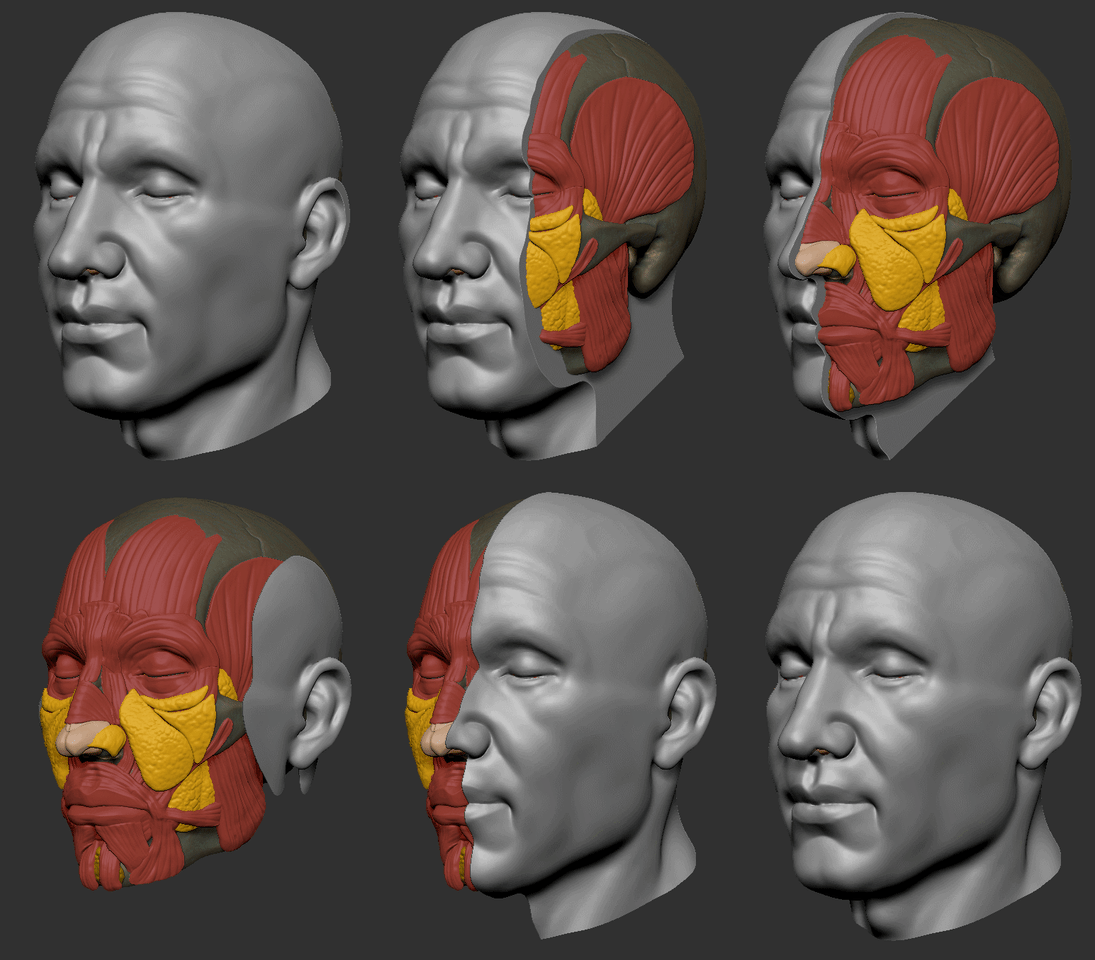
- Importance of anatomy. I know this seems obvious. And everybody keeps saying it… But this project was proof to me once more. If you only rely on reference, you are completely dependent on its lighting. But if you know what lies underneath, you can confidently say “naah, there is no bump there…must be the light” and sculpt it the way you know it just has to be. I tried to avoid the beginner-anatomy trap by taking anatomy classes and doing several studies before even thinking about making a character. Scott’s classes were very helpful. “Anatomy of facial expression” I found to be very good for refreshing knowledge and looking up things during sculpting. As preparation for my character, I did this little study where I sculpted a skull and put in the muscles and fat pads as good as I could. It’s not very good or accurate, but I think it really helped grasp the underlying anatomy of the face.
- Take your time. This is a big topic for me. And it goes hand in hand with actually finishing a piece. I think there is a tendency in younger artists to prioritize speed over quality. Because we have been taught things like time is money etc. and everything is moving faster and faster. The tech-heavy 3D industry is no exception here – hell, even a prime example for a fast-moving world with all its new tools and workflows almost every year. For production, taking shortcuts and working fast and efficient is totally fine and necessary. There is much beauty in taking your time for something though. For every step and every act. Especially when starting out, it’s so much better to learn without rush. Steady and calm. Working on spare-time projects, there is no need to hurry. Kris Costa works on his portraits for many months, creates his own skin alphas, hand-sculpts the eye… iterates like crazy. I believe that speed comes with experience. But all that is just my point of view. I’m a persistence-guy by nature and that brings its own issues. I’m facing the opposite challenge: For spare-time projects, I need to learn to call it a day and move on, because sometimes moving on and doing the next project gets you further than iterating endlessly. Whatever type you are, rush-guy or calm-guy, it’s probably good to learn something from the respective opposite. The interview with Alessandro Baldasseroni (below) is gold (the link points to a question interesting for rush-guys, but I totally recommend watching the whole thing).
Somewhat inaccurate study of the facial anatomy, but it helped me a lot:
Check out Kris Costa’s Instagram post showing all skin alphas he created himself for his spare-time project.
Low Poly
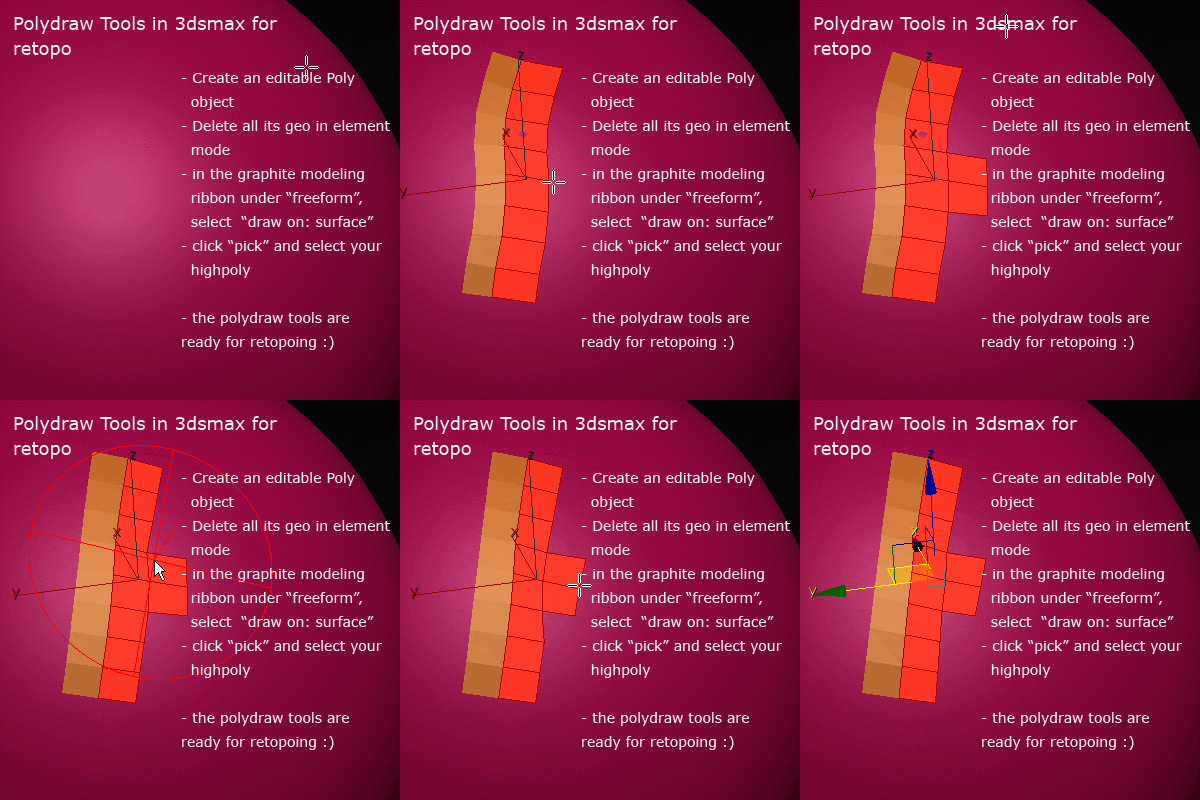
Regarding the low poly: no special tricks either. Just traditional poly by poly retopo in 3ds Max. Retopology can be a pretty tedious and daunting process, so it’s important to find a workflow that gets fast results and enables smooth working. I found that the Polydraw tools in Max work surprisingly well for that. Making yourself a nice shortcut setup can make the process even fun at times. I used Conform, step build, extend, relax and optimize. Quickly lay out your geometry with the tools provided and use relax from time to time. This way you don’t get stuck in endlessly placing perfect polys. In order to stay in my budget of 100k triangles, I roughly calculated the triangle count when I finished an area and thought about what triangle-count I likely would need for other areas. Eventually, I was almost on point with the polycount without many adjustments. For baking, I tried Toolbag for the first time and was really pleased with the results. Its super-fast, with almost instant feedback and it has handy extras like a paintable skew-map.
The PolyDraw tools in 3ds Max work very well:
Clothes
Besides the goals I mentioned earlier, I also wanted to learn several tools I never had used before. Among them was Marvelous Designer which I wanted to learn for a long time. Because I didn’t want my cowboy clothing to be my first crappy MD project, I worked on a test Jacket first. After I figured out how things work, I started looking up actual sewing patterns for the clothing I had decided upon. I also looked up a few videos on traditional sewing to refresh the little knowledge I had about sewing from school back in the days.
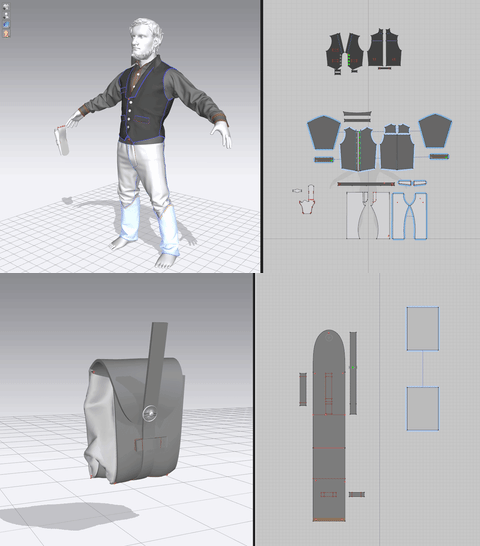
Since the character doesn’t have a body, I used a simple basemesh to have something to simulate with.
I think it’s important to not entirely rely on the simulation to make the clothing look visually appealing and realistic. It needs to be art-directed and “sculpted” in a way. I even blended different simulations together in ZBrush because I wanted the best of them in one mesh (there might be smarter ways to achieve that though). Don’t shy away from heavily altering your simulated mesh in ZBrush afterward – enhance it, emphasize folds, smooth artistically unpleasing areas, Sculpt new folds, add memory-folds and adjust volume etc.
I think it’s best to see a mesh from MD as a base for clothing, not as a finished garment.
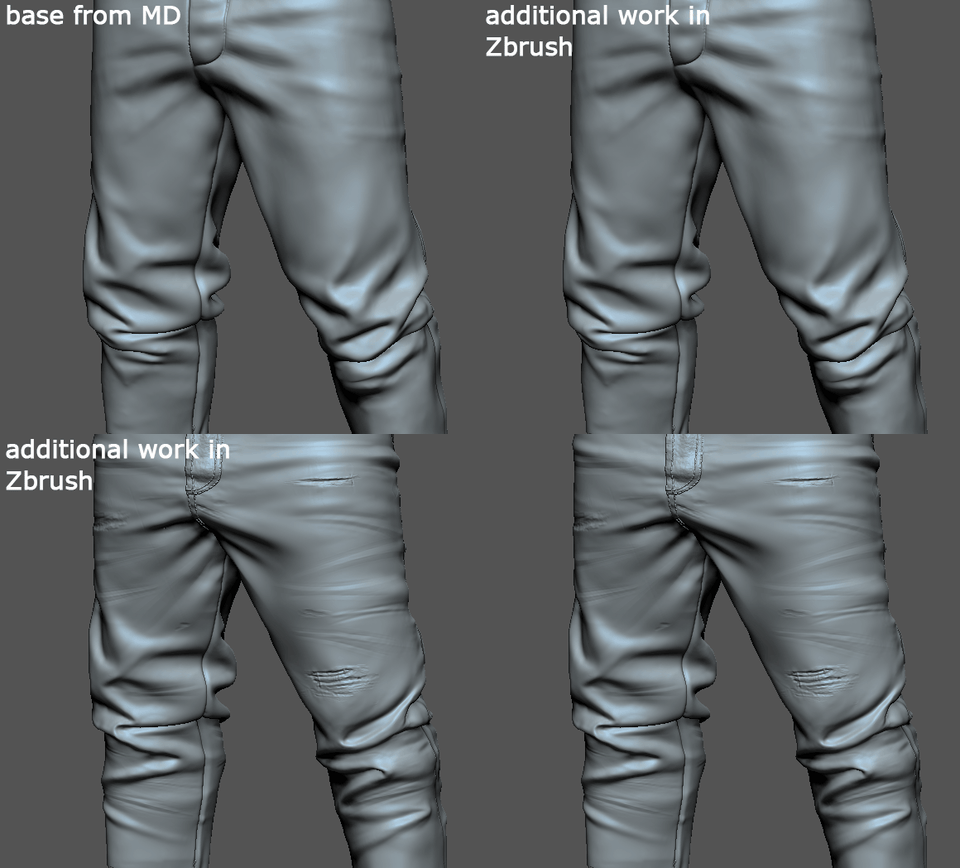
To get as close to the wanted look as possible in MD already, I tried a few different simulation approaches apart from the usual draping. Applying different simulation properties to the clothing between simulations gave me interesting results. So it would go like this: apply, let’s say, Leather. Simulate only a few seconds, stop the simulation and apply something less rigid, like velvet. Then simulate again for a few seconds. Play around with that and you can get things in between. In this case leather, that is a little less leathery.
Another thing I played with was layer-cloning. Let’s say you have finished a piece of garment, all the big shapes are there and you want to add some more interesting secondary forms. With “layer clone (over)” you can make a copy of the pattern that sits above the original. Freeze the original piece of the pattern below and re-simulate the new one. Try playing with the simulation properties for shrinkage weft and warp. Usually, you want to use a value higher than 100. Applying different fabric presets can also produce interesting results. These are not recipes for great garment, but nice ways to play around.
When draping and simulating, one should not forget to intentionally design and form the Primary and secondary shapes. While MD can produce realistic looking results, they can be boring to look at if you don’t have a nice rhythm in the folds and shapes. Compression and tension of the fabric can be used deliberately to create an appealing piece of garment.
Facial Rig
The facial rig is actually not that complicated. The whole head consists of several objects:
- Eyes (with 2 spheres each – one for the eyeball and one for sclera/cornea)
- Eyelashes (simple geometry)
- Eyebrows (simple floating geo with an alpha map and some additional haircards)
- Eye-wetness layer (piece of geo between eyeball and eyelid that helps embed the eyeball, transparent material with high gloss value)
- Eyeshadow (plane with alpha map)
- Beard (haircards with alpha maps)
- Hair (same as the beard but with multiple hair strands)
- Inner mouth (upper and lower gum with teeth, each simple geo, baked from high poly and textured)
- Tongue (simple geo, textured in Substance)
Most of the components are self-explanatory I think. The eyes are a little more complex though. For that, I highly recommend the eye tutorial by Pete Zoppi. I basically just followed his tutorial. He uses a really neat technique to fake refraction. Check it out.
Something I would like to stress in particular is the impact of the eyeshadow. It visually integrates the eyeball into the socket. The lack of it makes characters look very creepy as it makes the eyelids to seem wide-opened and the eyeball to glow. I see many beginners drop the shadow entirely. The problem is that it needs to be faked in real-time – the solution is quite simple though and maybe it helps some if I give a quick overview.
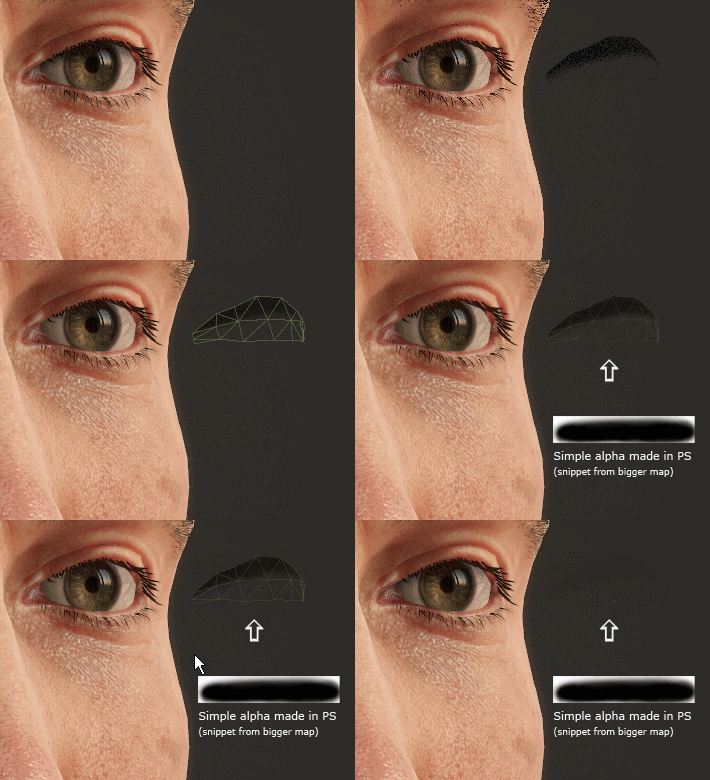
As you can see, the eyeshadow actually is just a simple piece of floating geometry that has been unwrapped and textured with a simple alpha gradient in Photoshop. In Toolbag, just plug the gradient texture into the albedo channel of a material, set transparency to dither, check “use albedo alpha” and you are done.
Fabric Materials
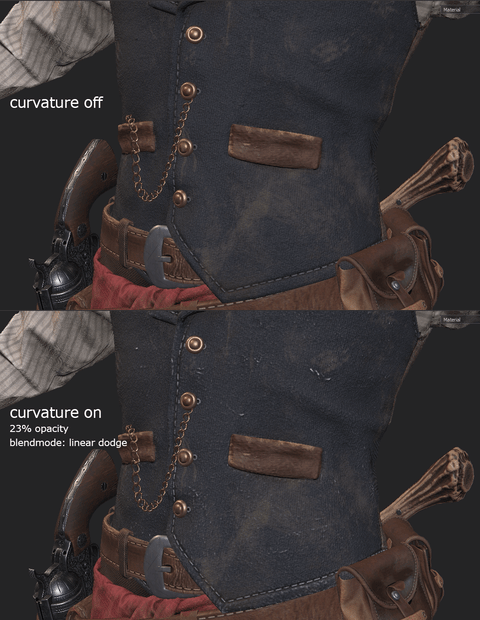
It’s important to decide which material a certain clothing piece is supposed to be made of – already during sculpting and MD phase. This will help tremendously with texturing and believability later. Different fabrics create different folds, according to thickness and structure. Ideally, the type of fabric is already recognizable in the sculpt. Only tertiary details like weave are added during texturing. Sometimes there are reasons to put them in the high poly though. I added some high frequent details in my high poly which I thought would help sell the material. It worked quite well together with a little trick I like to do: using the curvature map with overlay and reduced opacity to give some additional pop.
For the clothing, I also used the curvature map to add subtle wear and tear.
Here are a few general notes on my personal approach to texturing:
- Think in layers. I’m rather talking about the way of thinking than actual layers here, though actual layers can help. Start with a base that defines color range and scale. Both are key to believability. I like to use fill layers with noise as a base and then play with the UV scale. It’s a good way to set the scale. Then add variation to that and keep building on top of that. For the weave patterns, I mostly used the patterns that get shipped with Substance Painter.
- Variation. Real-world materials are almost never perfect in any way. Incorporate that by adding variation to the pattern, size, color, saturation, and alignment.
- Story. When texturing, I constantly ask myself if I could guess the material if I would touch my textured model. Could I feel the cold, heavy metal of the gun? The thin and soft fabric of the shirt? What would the fabric look like after a few days in the field? Sweat, dust, damage, wear and tear – put yourself in the characters position. Think about what he might have done so far and tell it through subtle touches in the texture. E.g. my character has subtle green stains on the butt, suggesting he occasionally sits in the grass or on the ground. It’s not very noticeable, but these things add up to the overall appearance. Damage is a type of story, too. Think about where damage and wear and tear are likely to happen. Think about the ‘why’. The belt, for example, has wear and tear on the front next to the buckle because that’s the area with the most stress.
- Too much spec. Or “getting the roughness just right”. I made that mistake myself in the past and see many others make the same mistake: Tinfoil armor, soaking wet clothing. The right roughness value is very important for all materials. As long as it is not fully intended to make something look very specular, it hurts the believability a lot. I think that many things are a lot less shiny than we think they are. It often gives things that typical CG look. I tried to pay particular attention to that.
Hard-Surface Props
Like in many areas of this project, I wanted to learn something new at hard-surface modeling, too.
I had done a few test objects with the liveboolean feature in ZBrush, but not a complete asset – so this was the perfect time to dive deeper into it.
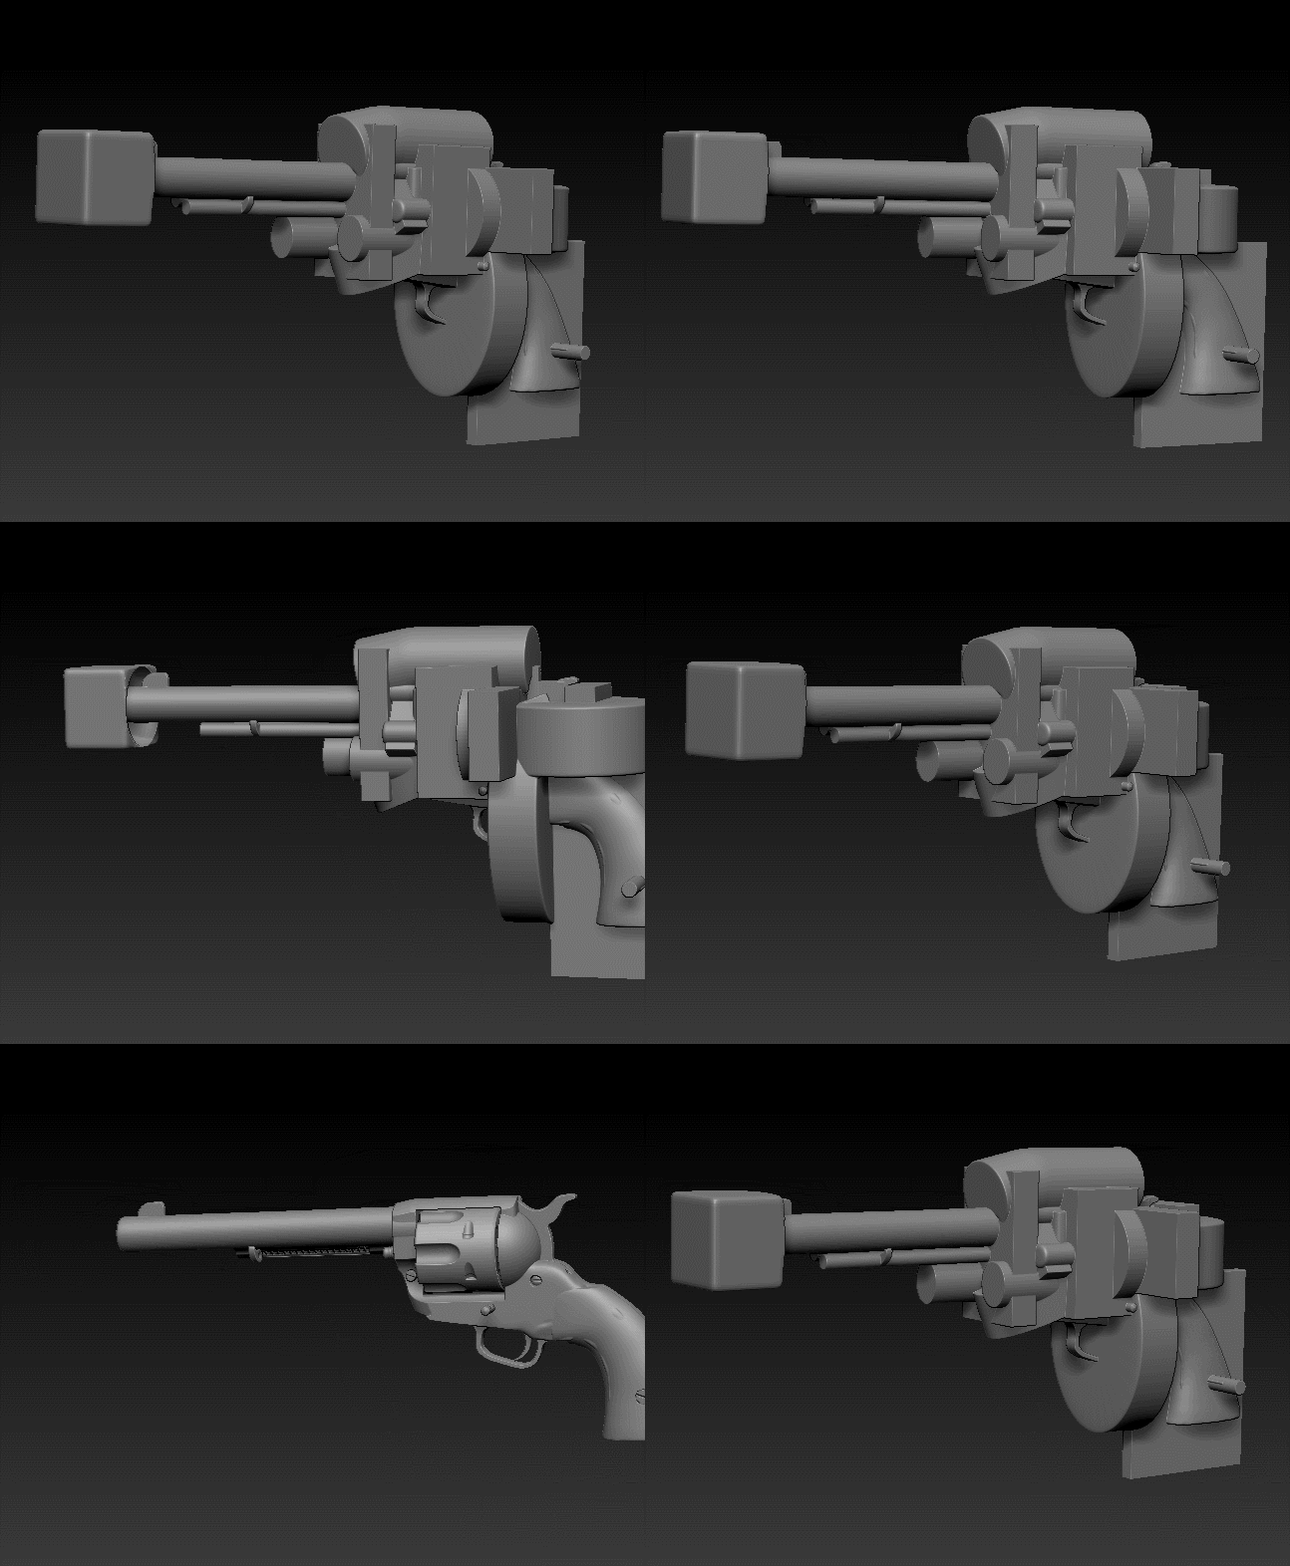
After some research, I started to build up the basic shapes of the revolver with the shadowbox in ZBrush. I found this a good way to get some “meat” to work with. From there, it was mostly subtracting shapes with LiveBooleans. It required some change of thinking. Most modelers are used to build up shapes. However, this approach requires you to think of the shapes you need to make in order to get the right form when subtracted. But I really liked the flexibility, speed and freedom this gave me, especially since I wanted to make my own revolver and not an exact copy of an existing one. I could imagine this approach is not the perfect one when modeling exact copies according to reference, though it is possible of course.
After you have all the basic shapes set, you just keep adding Boolean operators to refine them.
I used them for almost everything: from big shapes, bevels, drills and wholes to the rifling in the barrel. As you can see down below, it can get quite messy but it was a lot of fun and it’s definitely possible to organize things a little more efficient. What I really love about this approach, is that it gives objects a special sense of realism due to the way things get made. It’s pretty close to the way guns and other things are built in the real world compared to subD modeling, etc. as you can see in making-of videos from real guns. Thus, effectively as a by-product, you get most of the separate components that something like a gun has, almost automatically.
The image below shows the boolean operands and the result when switching on LiveBooleans.
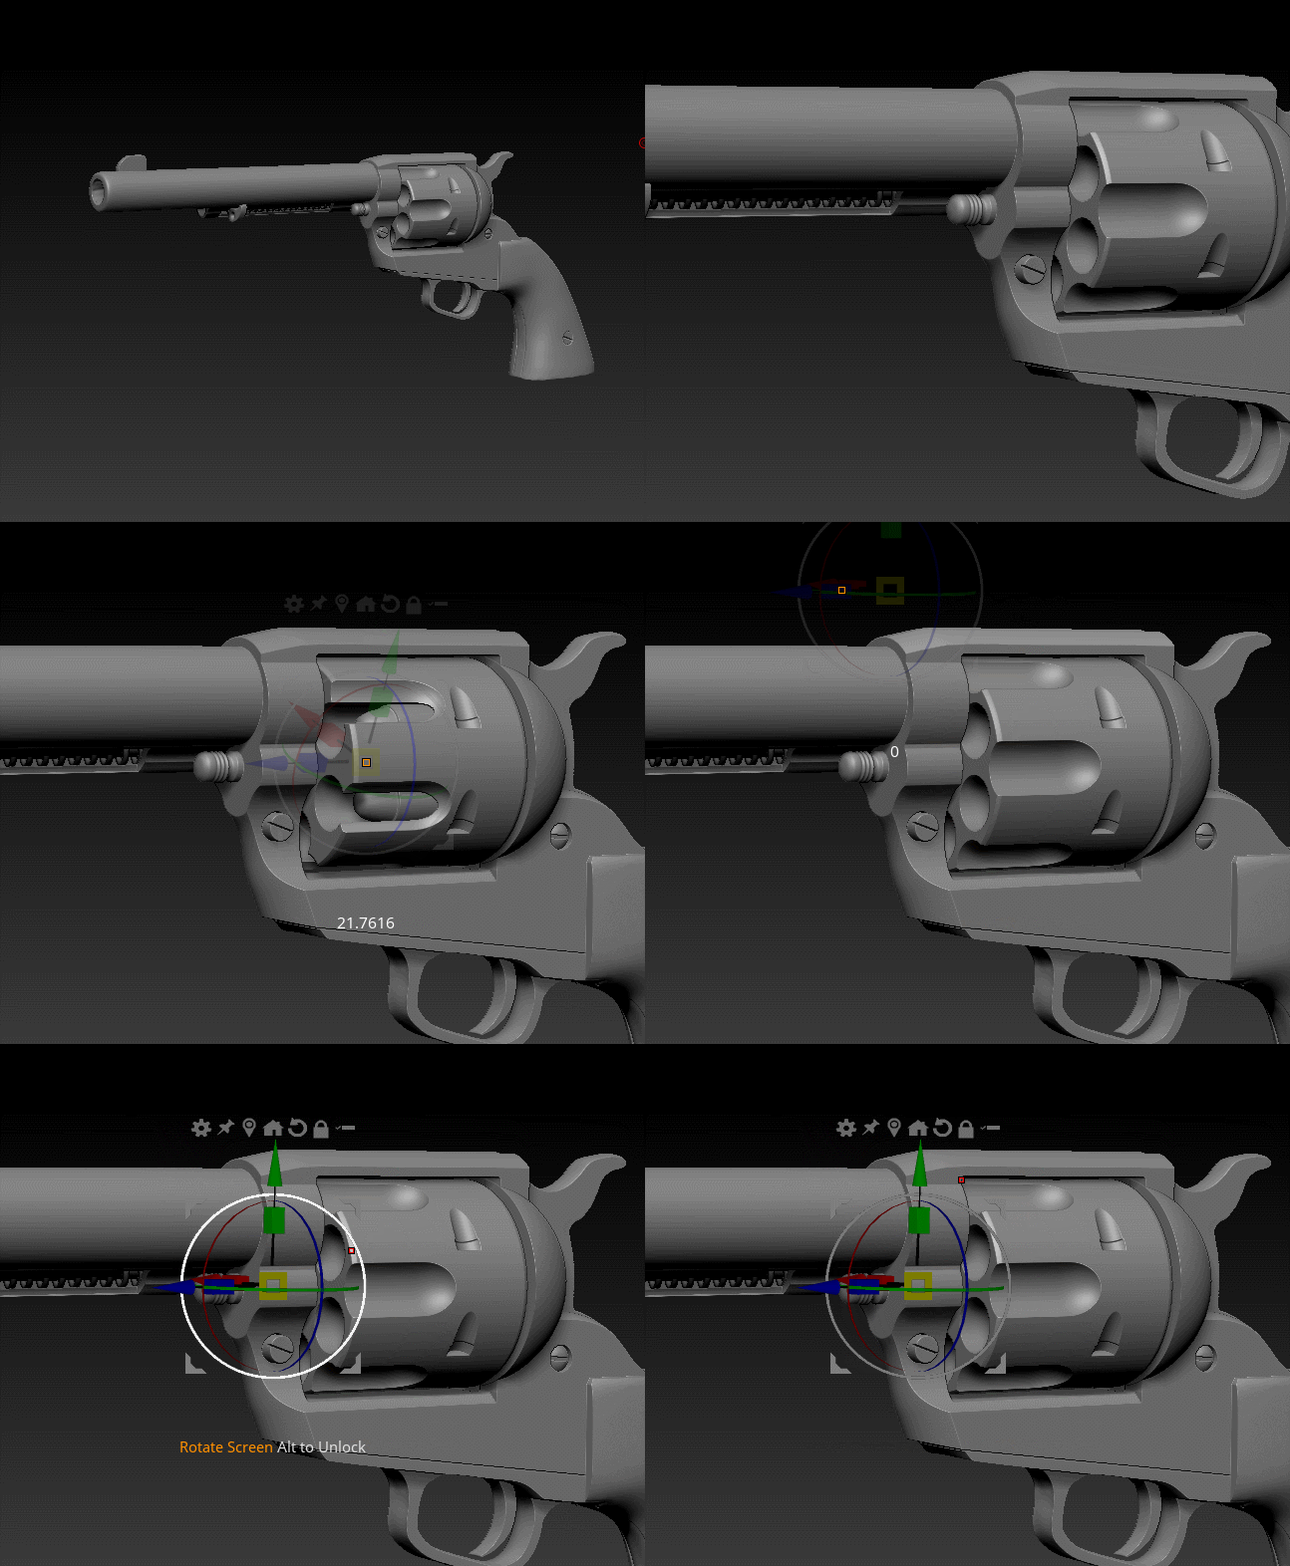
Here, the operands are hidden (LiveBooleans switched on). When clicking alt+left click on an intersection, one can select and edit the corresponding operand.
When all the shapes are there, I use the polish features under Deformations tab to make all edges less sharp and more natural round.
Most of the engravings and other details are hand-sculpted, some are made with noisemaker. A few additional elements I added later on in Substance Painter. For the ornaments, I used the Zapplink feature and Photoshop, which I briefly explain in the images below.
Starting in ZBrush, then switching to Photoshop:
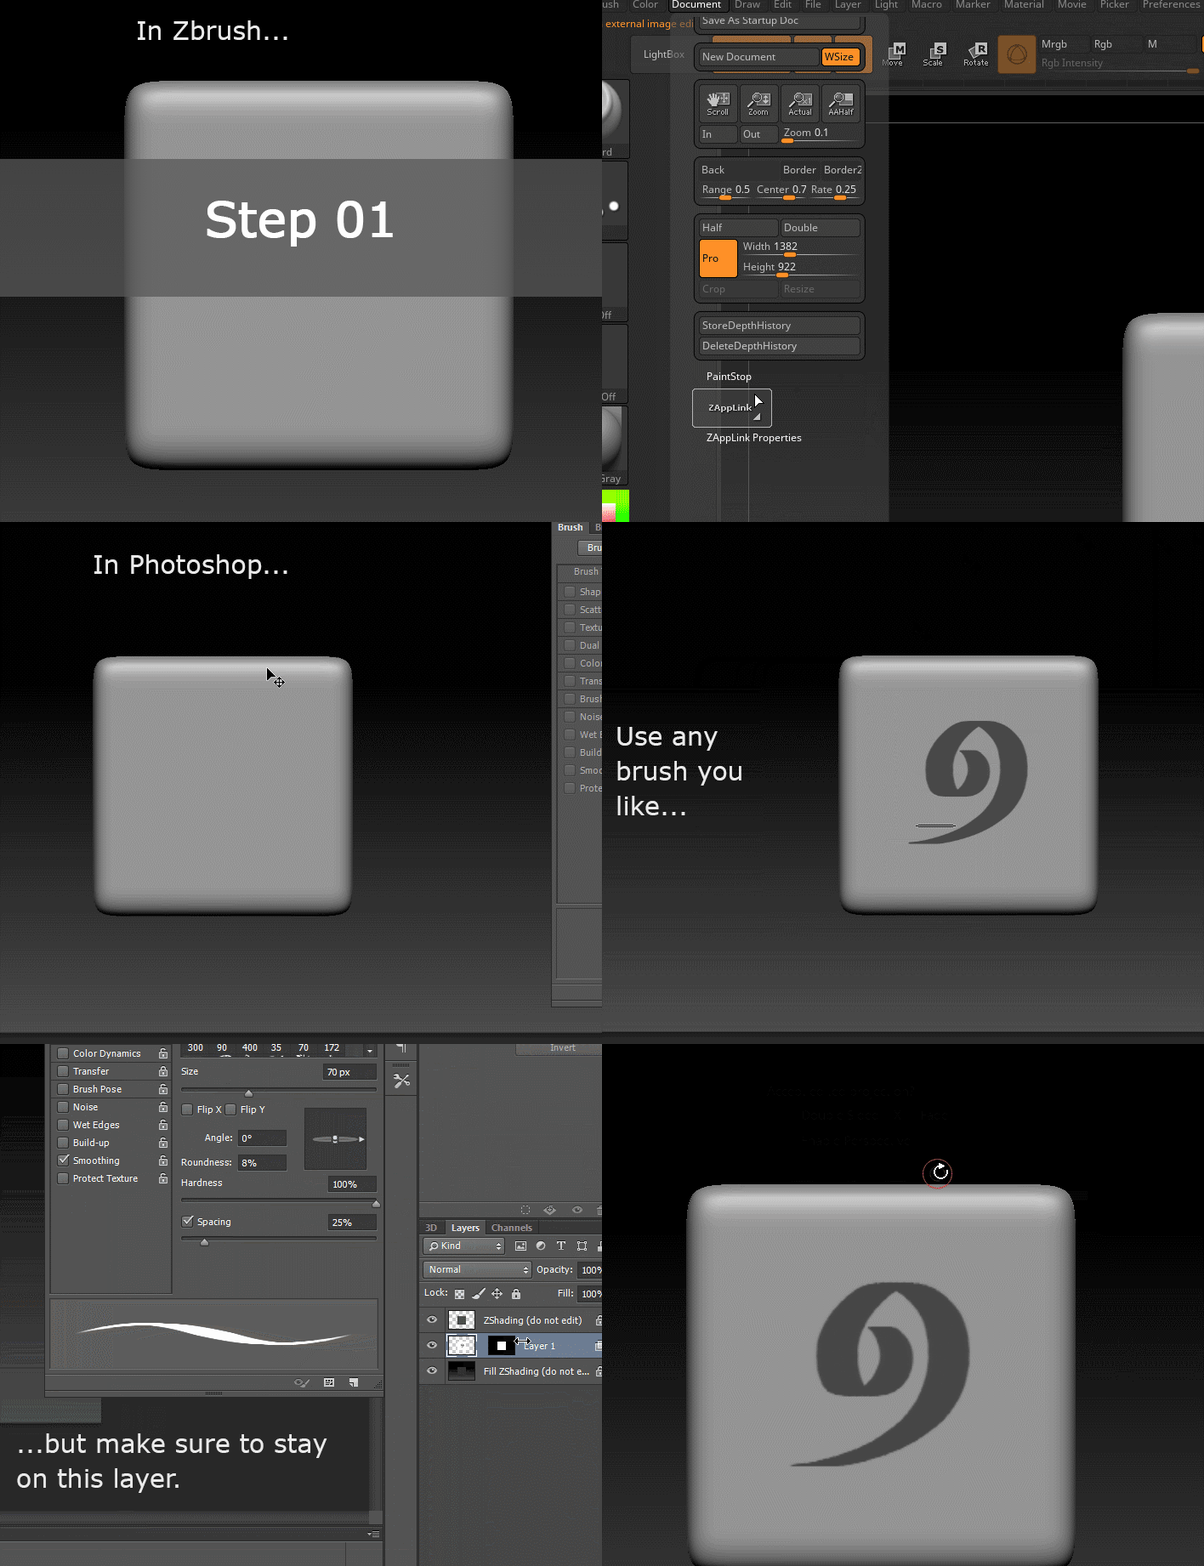
Turning painting from Photoshop into Polygroups:
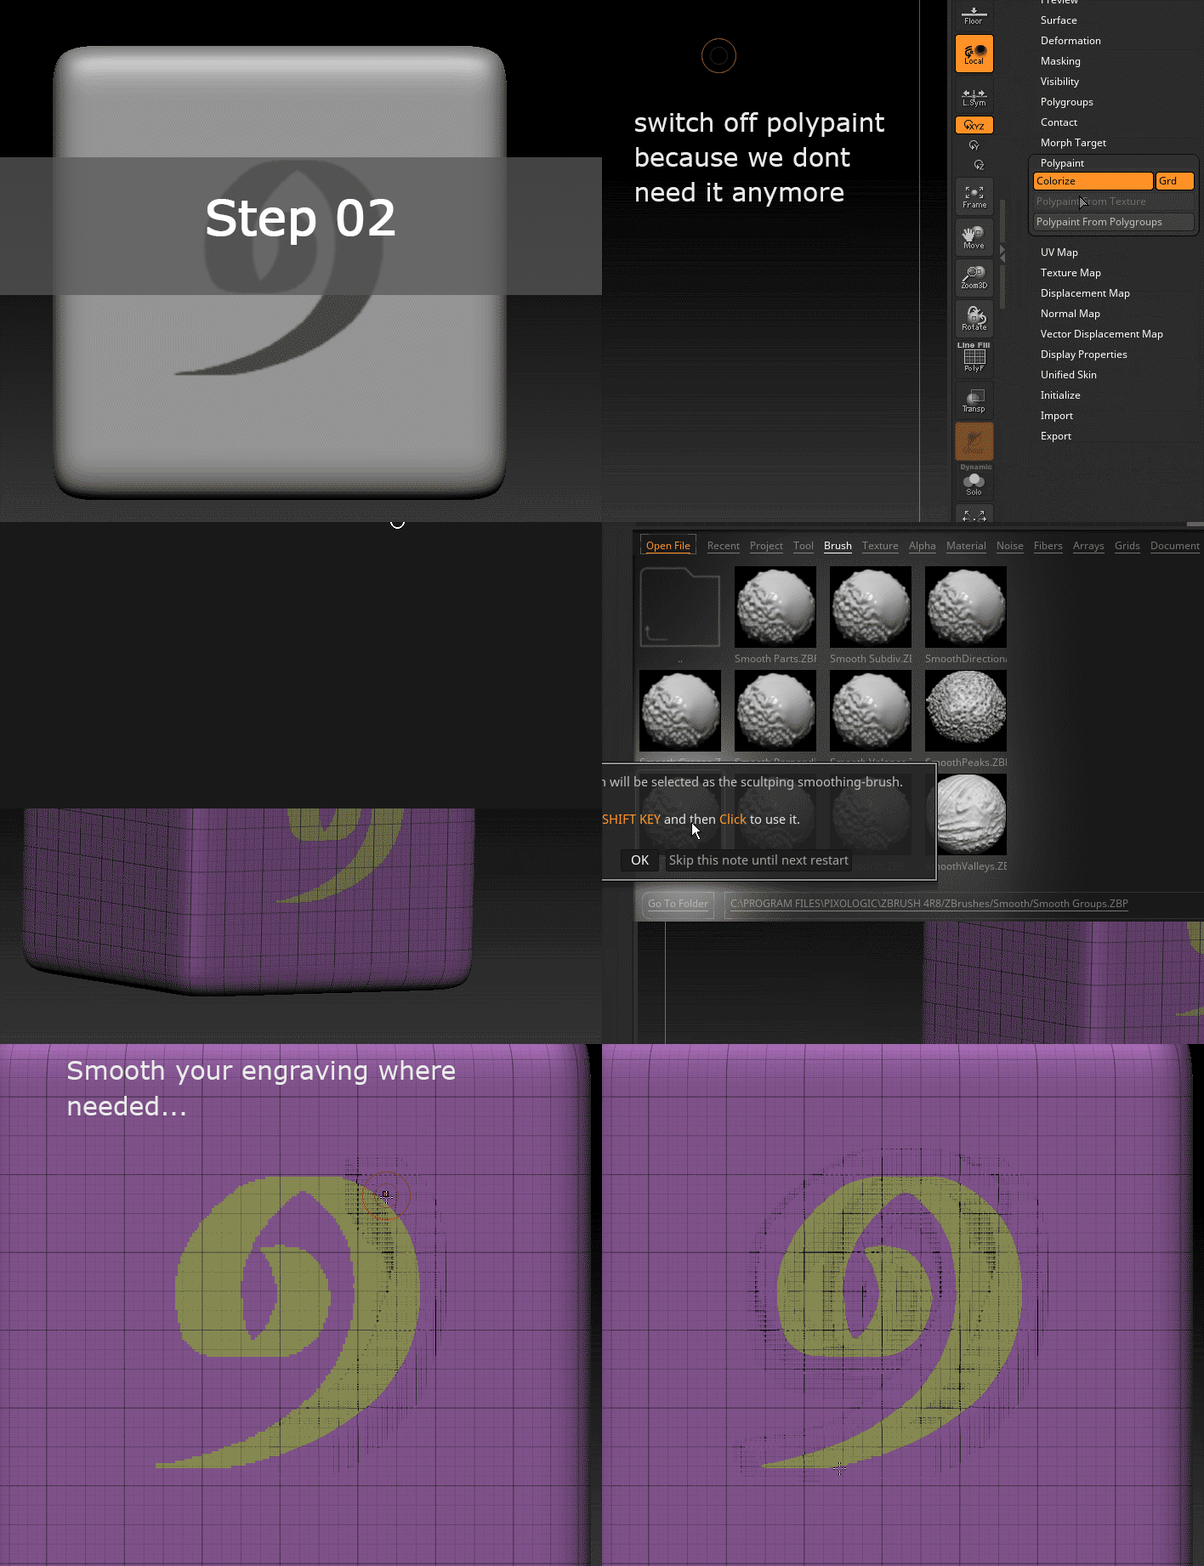
Extruding the ornament with the transpose tool:
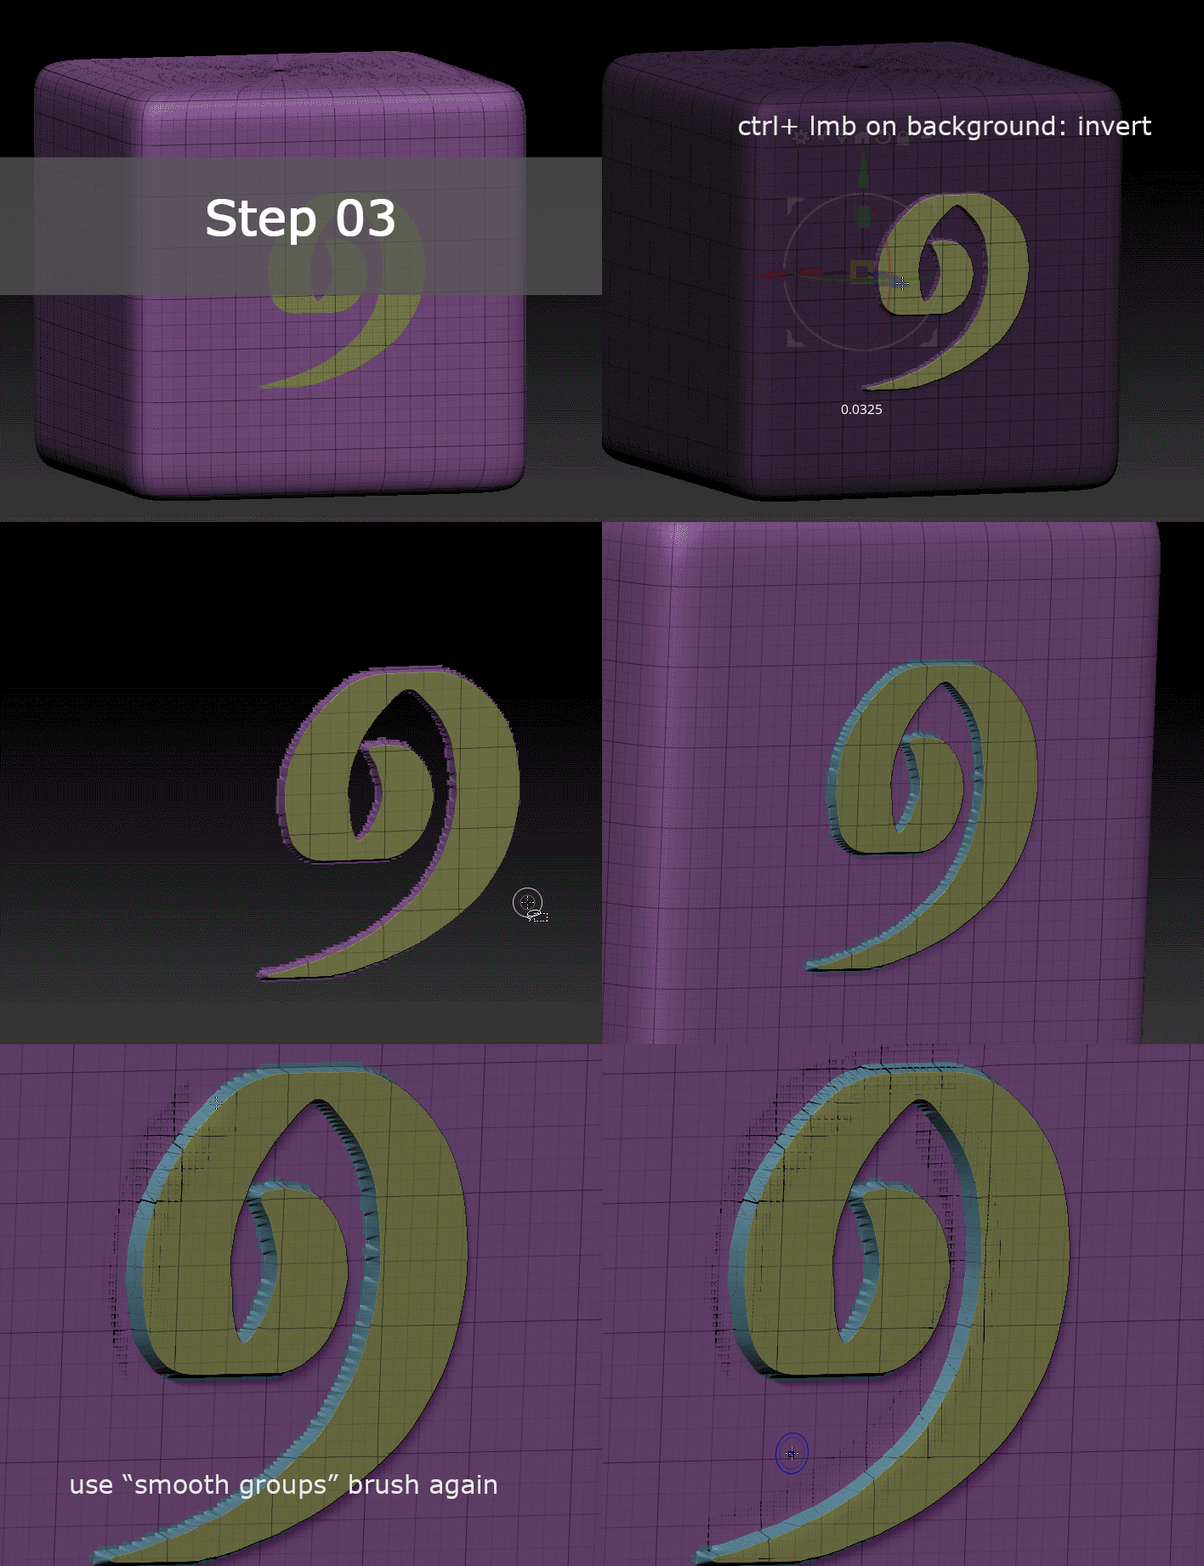
Using the polish features to refine it:

Animation
The animation is done with Mixamo and some adjustments in 3ds Max. Just upload the mesh and follow the instructions. It’s actually a really straight forward process – at least as long as you keep one mesh per animation/pose. I tried to have several animations in one sequence and ran into many problems, but this shall not be the topic today.
Marmoset handled the imported FBX with animation very well.
Some weighting adjustments had to be made for the animation to work properly. When downloading the FBX from Mixamo, make sure to select “with skin” so you can easily modify the skinning in your preferred 3D package later on.
I adjusted the weighting for the bags, knife, revolver etc. since the algorithm treated them as parts of the body, which was to be expected of course. Apart from that, only the hands needed some manual work because my character’s t-pose had the arms slightly bend towards the front and the algorithm had problems identifying the wrists, which resulted in hilariously rubbery looking hand-movements. I would suggest avoiding that by keeping the arms straight when you plan to use Mixamo.
Presentation
As for the presentation, I wanted to get away from the typical T-pose as far as possible. I always thought that many exceptionally executed 3D characters literally get killed by a T-pose style presentation. While it may be a good way to showcase the technical elaborateness and level of detail, it shows the character in a way only objects would be presented. That’s why I wanted to only show T-pose shots further down – together with more technical views. The first impression was supposed to be shots that look like they were taken during a typical day in the life of my wild west alter-ego, conveying soul and lifelike behavior. Walking and preparing food seemed fitting for that.
Lighting
Another challenge was the lighting. As the saying goes, a mediocre piece may shine under great light – but a great piece under poor light may not be seen at all (or something like that, totally made this up, haha). To be honest, I really struggled with the lighting. I think the problem was that I wanted too much at the same time: moody light AND great readability of silhouette and details. My advice would be to decide for either one of them(something I will consider for my next project).
I ended up using a skylight (HDRI) as fill light and some additional lights for rim-light and highlights on particular spots:
- One spot from behind to make sure to have a nice and visible sss effect on the ear
- A few spots from above to support the hair and highlight the face
- One directional light for the rim-light
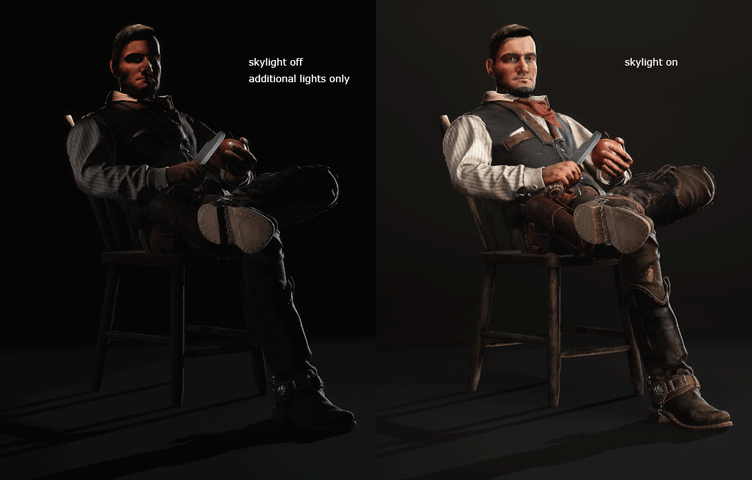
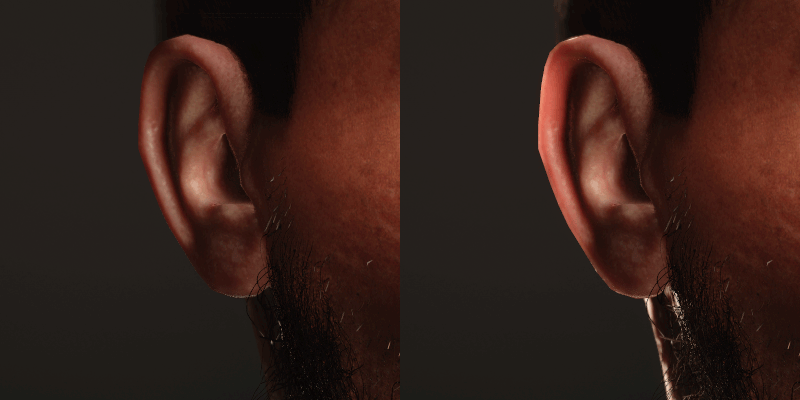
Making sure that Subsurface Scattering gets some light to work with helps to add life to the character.
I hope this was interesting for some people. If there are any questions, feel free to reach out to me on ArtStation!
Malte Sturm, 3D Artist
Interview conducted by Kirill Tokarev
If you found this article interesting, below we are listing a couple of related Unity Store Assets that may be useful for you:
© Daria for 80lvl, 2019. | Permalink | No comment | Add to del.icio.us
Post tags: 3d art, 3DS Max, character, gamedev, indiedev, marmoset toolbag, Marvelous Designer, Substance Painter, wild west, ZBrush
Feed enhanced by Better Feed from Ozh
Source : https://80.lv/articles/001agt-002mrs-004adk-crafting-a-western-self-portrait/


