
Alexander Kolyasa and Mark Kassikhin were kind enough to share a detailed breakdown of their astonishing Racer’s Shelter created in Unigine: working with references, advantages of the engine, modeling, texturing, setting up lighting, and more.
Introduction
Alexander: My name is Alexander Kolyasa, I’m 26 and I have the education of an architect. It’s where I got my first bits of knowledge about 3d.
I got a bachelor degree, but I realized, that games are much more interesting for me. And in 2014 I got my first job at a small local game dev studio. However, I didn’t know anything about UVs, texturing or retopology at that time.
As expected, I was expelled from the further education in my academy because I started going to work and not to classes, but I don’t regret that as I’ve found my passion!
And now, for almost 5 years I have been working in game development, in particular, for 3.5 years I have been working at Plarium Krasnodar as a 3d artist.
In my free time I usually make my own projects and learn something new in 3D, also a huge part of my life is video games, case you always can learn something from it, discover how things are done and find inspiration and some solutions for future works.
Mark: Hey, my name is Mark Kassikhin. I’m 25. When I was 14 I started studying at an art school and I was studying there for the next 4 years, but unfortunately, I graduated from the university with different qualification.
Until CG I was a photographer for about 5 years and after a while, I realized that wedding photo sessions were making me tired and I needed to move on.
I started trying to shoot videos and a little later I discovered 3D. From time to time, when I looked at the dailies I understood that I failed the angle or I didn’t have light sources, so 3D would be an awesome decision for my goals.
Six months later I joined a young company “Gamanoid” LLC. I had the opportunity to progress and explore software and CG. In two years I joined Plarium and moved to Krasnodar and I’ve been working there for 2,5 years so far. That is where I met Alexander.
Racer’s Shelter
Mark: Looking at other artworks on ArtStation I was inspired by detailed projects. Where you do not just see a picture, like it and scroll down but you can see details, discover a short story or some easter eggs. When an author has a dialogue with a viewer.
I decided to make a huge turbine with many details. I showed Alexander some stages and he came up with a good idea. It would be not just a turbine, it would be an entire environment with a hero asset.
At an early stage, we imagined it as a garage with a turbine being repaired there.
At the texturing stage, I couldn’t decide for a long time how the case should look. I tried different variations and finally, I got a good idea. What if we paint it in a rally car style?
I tried it and called Alexander and asked him – ‘Do you like it? -Yep’.
I realized It had to be not just a garage. It had to be a story about a racer. When the details could tell the story. The story about an old racer who in his youth set a speed record driving the podracer. And now he is preparing it to set a record again.
We started to develop this idea and discuss what can reveal it to a viewer. Also, we wanted to fill it with something that we like.
Thus souvenir magnets from our hometowns appeared on the fridge door. Alexander is from the Crimea and I’m from Volgograd.
Stephen Hawking “A brief history of time” inspired me much as well, you can see the book on the table.
Also, we added some references from pop culture of the 90s. The time into a hangar is the 90s too, but 100 years later it can be seen on the calendar with Pamela Anderson. Sega on the table, David Hasselhoff photos on the locker. I hope it can help to make the project better and appeal to the viewer’s feelings.
Choosing Unigine
Alexander: I already had some experience with other popular engines, and already planned to build a project in another engine, but quite by chance I somehow found out about Unigine. I always like to discover new software, so I watched their Superposition movie and I really liked it.
Then I went to their website to find out more about this engine. After reading the information on the website, I clicked the button to request a demo version of the engine for review and the guys kindly gave me it.
First, I really liked the fact that I immediately began to navigate well in Unigine, despite the fact that I opened it for the first time. Also in just one click, it gives you access to many features such as triplanar texture projection, screen space bevels, screen space dirt, parallax texture displacement, volumetric lights, animated vegetation material, and many others.
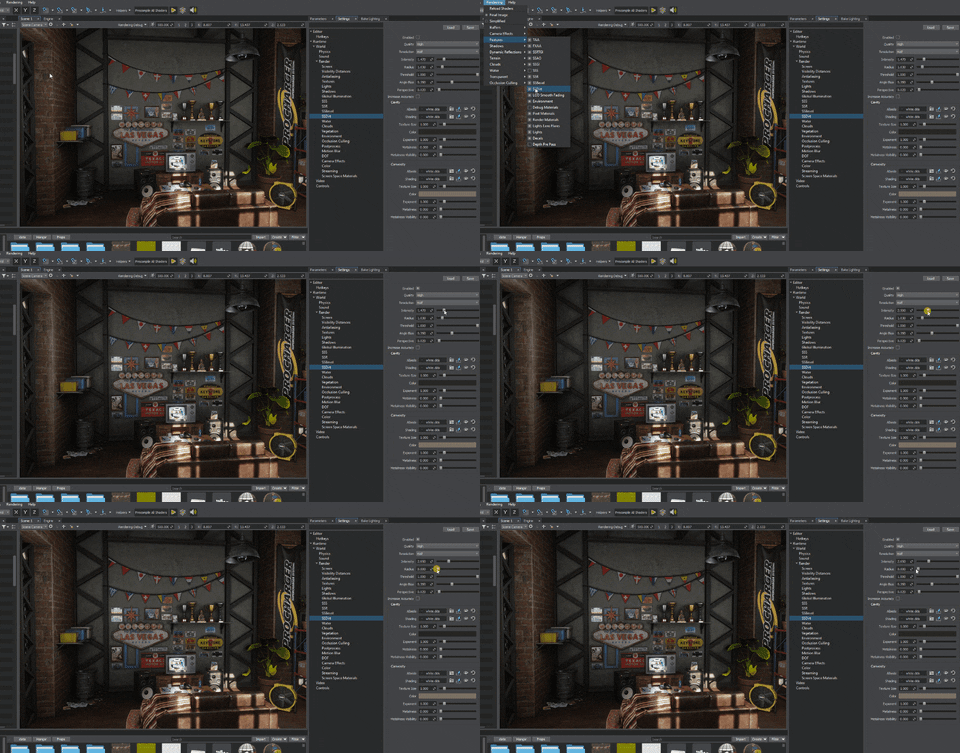
All this is available and understandable immediately and you don’t need to watch video tutorials to understand how to use it, you don’t need to use scripts, blueprints, or collect large chains of nodes in the shader editor. One check mark and ready! Someone will say that when you create the functionality you need by setting up all nodes by yourself, it’s a more flexible solution, but I just needed it to work.
I had an idea in my head and I wanted to implement it as quickly as possible, without stopping to set up all the features that I need. Sometimes it’s not very easy for artists to understand all these technical nuances, and Unigine was able to help me focus more on creative moments, rather than technical ones.
Also, it understands Cinema 4D’s Null objects and the hierarchy of objects. It helps to manage C4D’s scenes and I was surprised that I can use the relationships of the same objects in the engine. So I exported all objects in groups to easily manage them inside Unigine.
The last thing that finally convinced me to choose this engine is the light baking system. Here you do not need a second channel for the lightmap or even the first channel with UV. Unigine uses voxels to bake light, so you can even take a model from some CAD software and bake light on it without the slightest additional manipulations. You just need to put the Voxel Probe in the scene, define the capture zone and press one button.
I really liked the result of light baking. I made a few tests in different engines with the same block model of the hangar and only in Unigine I did not receive any artifacts.
No black spots at the intersections of geometry, no light leaks. I knew how to fix these artifacts in other engines, but I didn’t want to waste my time on this because there was still a huge amount of more important work ahead. So that’s how I chose Unigine for our project.
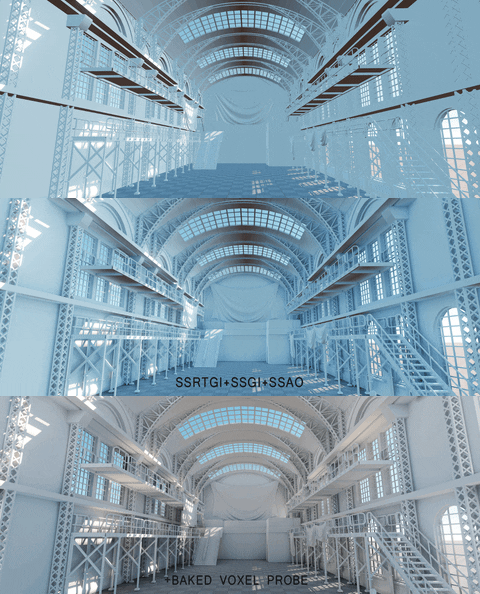
Gif. First light baking test in Unigine. Low-resolution voxels, baking time 7 minutes. No UVs
Production
We started our project in early 2018. At first, we had no clear plan, no idea what the end result would look like.
We made the first blocking of the hangar and started making different props, without setting any time limits.
But it turned out that during the first half of the year, most of the time, we either engaged in various freelancing projects or played video games all evenings. Suddenly, by the middle of summer, we realized that half of the year is gone, and we almost didn’t make anything.
Then we decided to make a clear plan for ourselves. We created a shared folder on the Google disk, created a spreadsheet and wrote there everything we needed to do. We marked with color who will make each prop, identified priorities what need to be done first and what can wait.
So we gradually began to immerse into productive work.
As the assets moved to the final stage we marked them with different colors to be able to see at what stages it is right now. We uploaded the finished models and textures to our shared folder so that everyone has access to each other’s models. At first, we worked just on a single asset from beginning to end, but soon we realized that this way you start to devote a lot of time to small details, so we began to break the assets into logical groups depending on the zone and make the whole pack of props at once. For example, a pack of tools, a pack of garbage, a pack of food, etc.
It was easier for us to model and texture 5-10 assets in a group at once, than each individually. This helped to maintain texture detailing at about the same level.
The modeling stage was not something special, we made all our models in Cinema 4D, trying to use as many deformers and generators as possible, they greatly simplify modeling and help to make retopology faster.
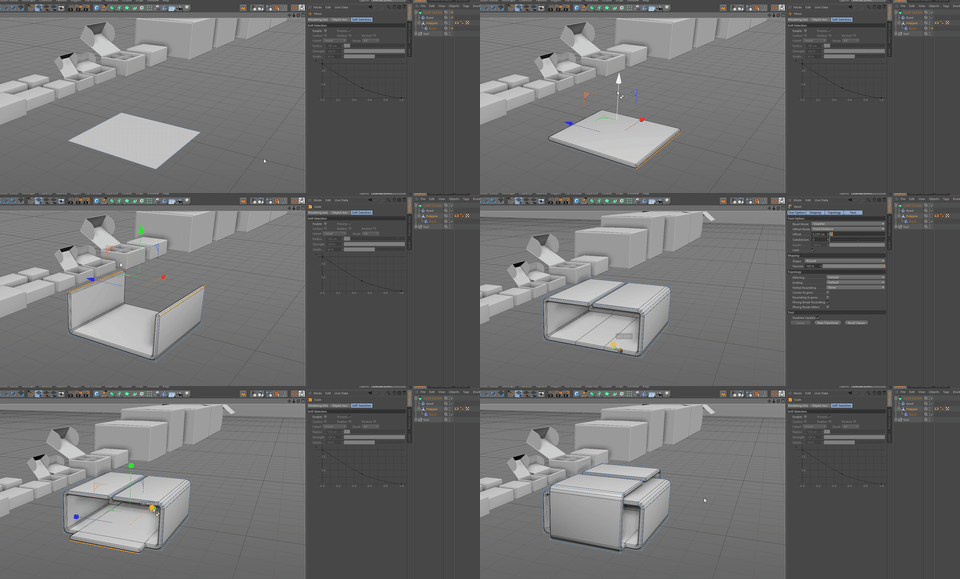
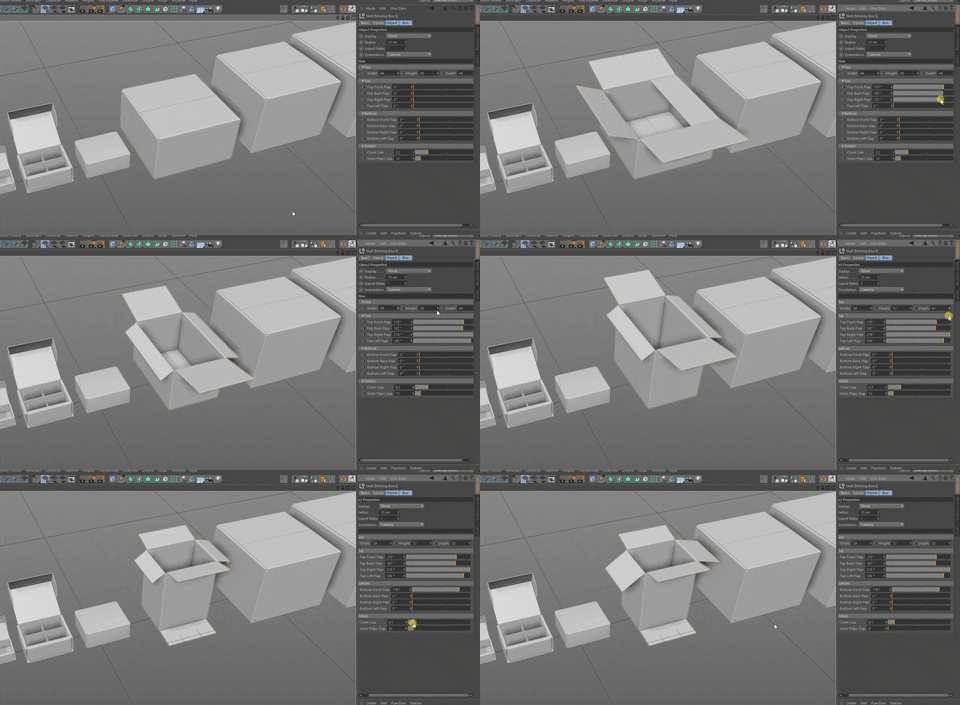
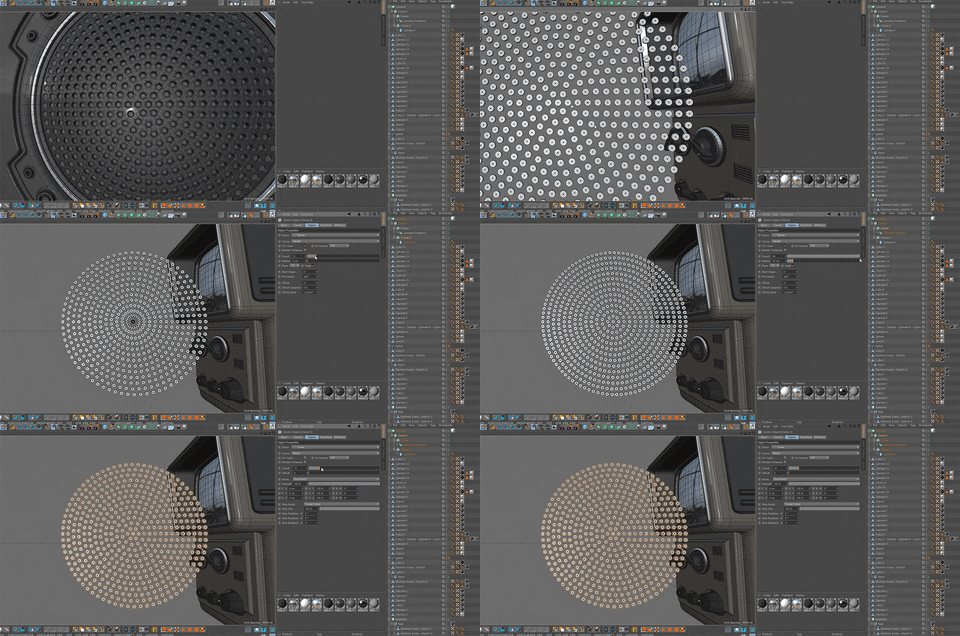
For example, sometimes it turned out that in order to low poly model, it was enough just to turn off the bevel deformer and remove several edges on the cylinders.
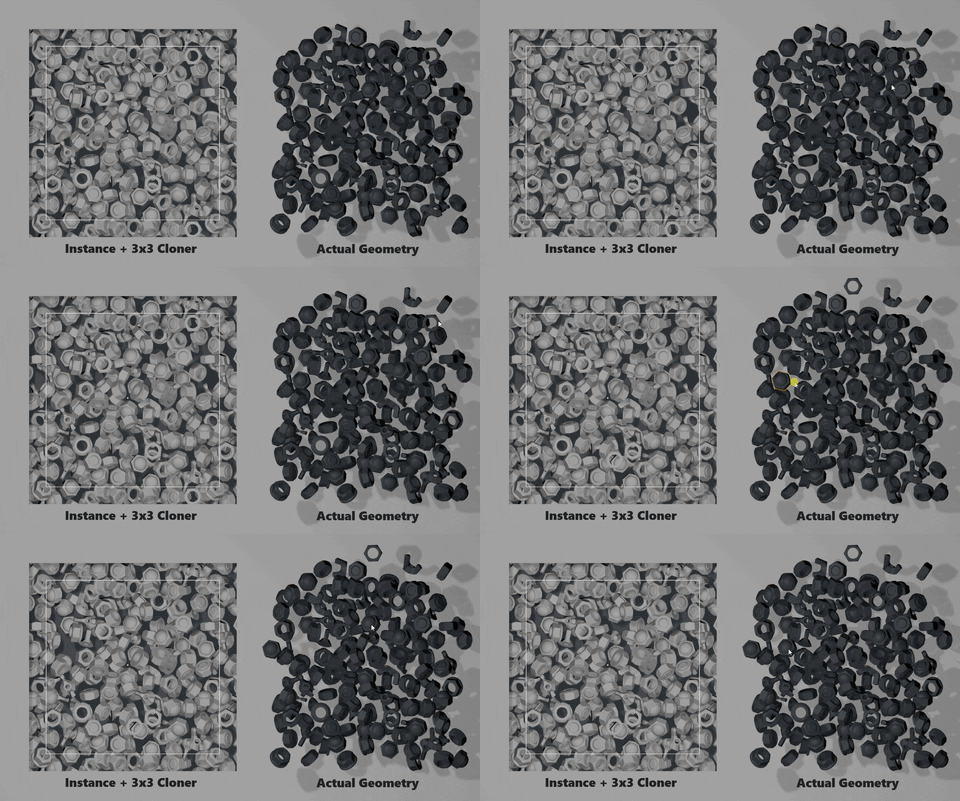
Another trick that helped us to save our time, is that when there were a lot of repetitive parts in the model, we tried to make high poly and immediately low poly version, then we attached this low poly as a child to hi-poly and duplicated them all together wherever it necessary.
At the stage of retopology, all the high-poly parts were simply hidden and low-poly remained. Also, since we did it all for baking purposes, we tried to actively use floaters where possible.
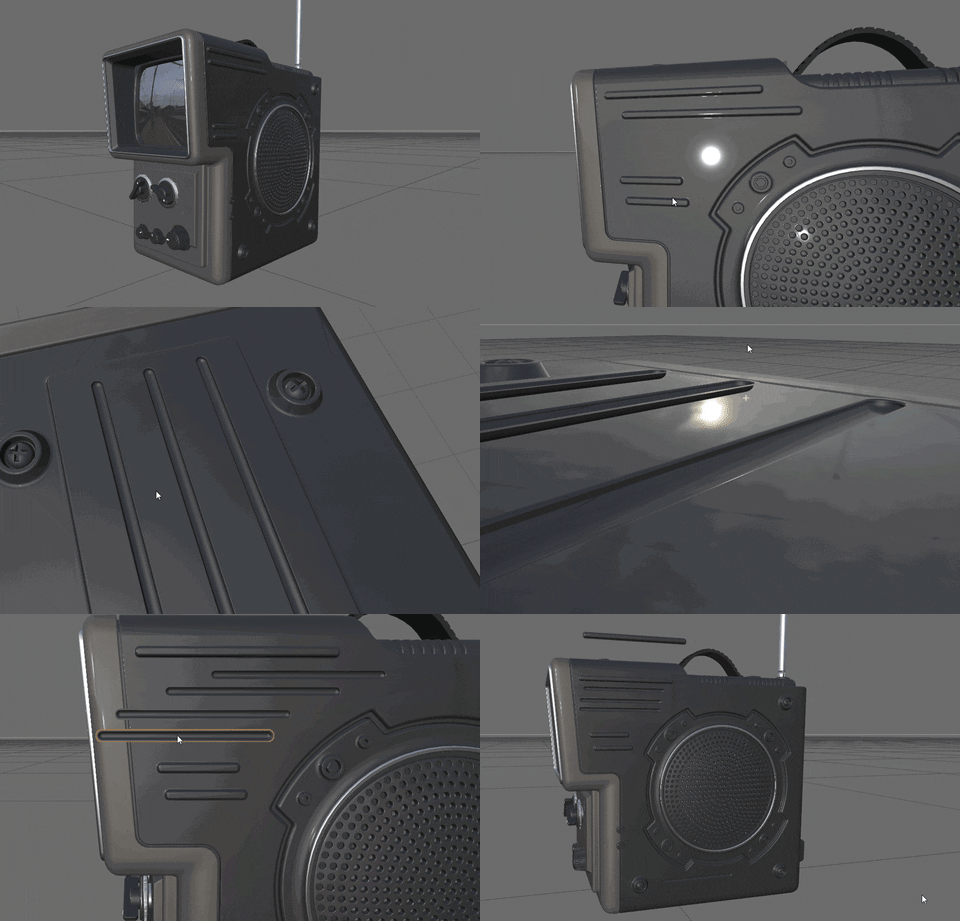
It allowed not to bother with the topology of the high poly and it can be perfectly baked on the normal map.
We unwrapped our models in RizomUv and UVLayout, baked in Marmoset Toolbag. There were no secrets here, you just need to separate your model properly to different baking groups and models will bake in one click. Also, try to think about the baking process while you at the high-poly stage. When you gain more experience in baking, you begin to understand how most artifacts can be eliminated if you think over high poly correctly.
Texturing was mostly done in Substance Painter, but some tiled textures were made in Substance Designer, using the height map from Cinema 4D for the base and also we used Quixel Mixer a bit with Megascans.
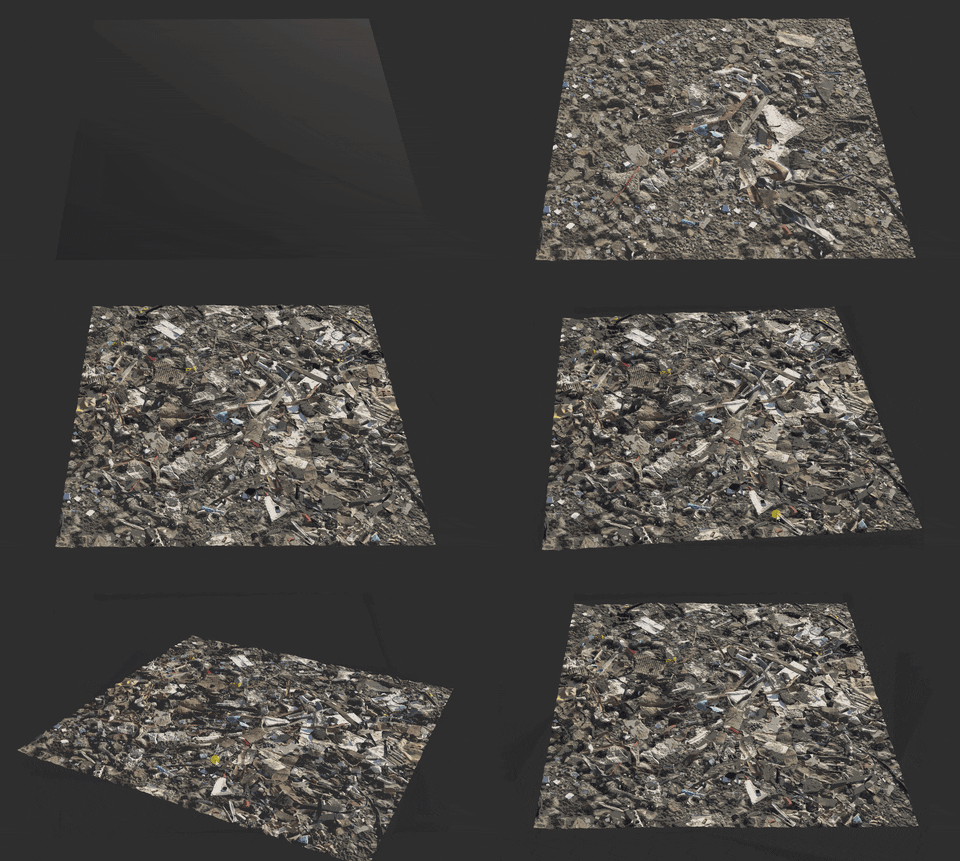
We tried to give a habitable look to each prop.
Make the viewer believe that it’s not just scenery, but someone really used them. This can be achieved through the creation of specific damage. Always try to think about how you would use this prop and what incidents might occur during its use. Perhaps you could drop it out of your hands, or pour something onto it, touch it with dirty hands, etc.
We also liked to add to assets some stickers that say something about the hobbies of our hero, about his leisure and temper.
Texturing stage, probably our favorite in the process of creating props. It is very interesting to analyze references, to determine how the object acquired such an appearance in real life, what affected it.
First, we always think about which layers of materials are present on the object and try to repeat them in textures. Sometimes it can be just a single layer of plastic, but sometimes some objects are created first from polished metal, then covered with paint, with time the paint cracks and moisture gets under it, which begins to destroy the metal layer and create rust between the metal and the paint, also there might be some dust and dirt on top of that layers, paint can fade out, if the object has been exposed to direct sunlight for a long time, etc. Be sure to analyze all this and try to transfer the maximum of this in your textures.
Another tip is about the overall saturation and brightness of albedo. To make assets look holistically in the final composition, try not to make the albedo of some objects too bright. Turn on displaying of albedo only and defocus your vision. Everything on the screen will blur and try to understand if there are any objects that stand out from the total image. If so, try to reduce the brightness of the albedo for this object. On the other hand, you can use this conversely to add some focus on particular things.
Some project statistics and numbers:
- 341 unique assets
- 157 materials
- 2127 assets in the whole scene (including duplicated assets)
- 3 165 169 polys
- 1 682 257 vertex count
- 4.08 Gb of hard disk space was used for all in-engine assets and textures
The Hero Asset
Mark: After we made the list of props, I needed to decide how the ship must look.
If we show something like a retrospective, some view of past to future, the ship shouldn’t look as super-futuristic, fresh and high-tech. It can definitely drive above the ground surface. To have two engine turbines like a podracers and have a single seat.
The shape has appeared from logical solutions. If it has a separate body, it should have arms that are attached to the turbines. If turbines are deliberately huge, then the ship should have reinforced anchorage. Also, it should have an extended propellant tank and insulated exhaust.
If the ship stands on the ground, it must have landing gear for supporting.
As it is capable of moving at high speed above a ground surface, then it is likely that it may crashes collide with something (like a rally car), I added a cage for body stiffness.
The funny thing is, the turbine was the first prop, that was the beginning and the ship was the last thing which work was ended. Actually, it was a thoughtful decision. Because when we started the work on the hangar, we had no idea how it would look at the end. And the idea has developed in progress of work. We didn’t make concepts.
But we understood clearly, that if we can let a little style difference for props, so the ship must look harmoniously in the environment. And therefore, we didn’t want to limit yourself in the styles, if the ship was designed in any specific style. So we have saved it for the end.
Lighting
Alexander: Initially, we thought about what time of day we would have. It could be night lighting, where man-made light sources would play a major role in the mood of the scene, or daylight natural lighting. After a few quick tests, we enjoyed daylight, because we didn’t want to hide all our details in the twilight of the night hangar.
Each year tools become better and can more and more realistically calculate direct and indirect lighting. Those times are already gone when for a good result you had to use a lot of tricks and fakes, set up a lot of lamps in the middle of the room and imitate the light from the window. Each new light source that creates shadows in the game engine duplicates the number of polygons that it illuminates.
So you can quickly end up with very low fps. Luckily, now I could use one sunlight and it gave me pretty good lighting inside the hangar.
By the way, because of so many windows, in the beginning, it was too bright inside and it was not quite the mood that we wanted to reach. Therefore, I solved this question in a natural way, reducing the amount of incoming light by closing some windows with boards and reducing the number of broken roof sections. After setting up the sun I modeled the small autonomous lanterns with which our racer illuminates his workplace and also I placed a few bunker lights, to highlight certain areas of the hangar. It created an interesting play of light and shadows on the details of the turbine and other assets. Using this light sources I created zones to which we wanted to draw the viewer’s attention.
Also, I always try to position the light sources in such a way to create a good contrast between the light and the shadows in the frame using some basic principles of chiaroscuro modeling. This helps to emphasize the volume and texture of the object.
I try to avoid uniform lighting from all sides because this makes the picture flat. Another tip that should be used when working with man-made light sources, try to slightly change the heat of each source.
After all, in life all the bulbs are different and each can have its own individual color tone. Create contrast between warm and cold light. If you have predominantly warm lighting, add a few cold sources with higher color temperature.
We also had a great opportunity to get in touch with Davyd Vidiger, who, together with other guys from the Unigine team, invent and implements new features in the engine. He gave us some advice and told us the small nuances from the technical point of how the light works in the engine, this helped us understand a little better what the engine offers and how we can use it. Therefore we want to thank him for his help and you can read the article by Davyd, which he wrote for 80 Level describing which technologies help to improve the quality of real-time graphics today.
Advice
Don’t choose easy projects, but search for easy ways to implement them. You will grow faster if you do something that you never did before.
Also, we learned from our own experience that work goes faster and better when you have a clear goal and plan.
No need to put an indefinite time in front of you, like “I’ll make it somewhere in the future” It does not work out, you will always find the reason to spend on this piece of work a bit more time, to remake something, put it off for a week in search of inspiration, but this week can take a month, etc. Set yourself a honest deadline and try to stick to it.
Make a few props of the quality you need, determine the maximum time you need for this and do not spend more time on others. If you have the opportunity to cooperate with your friend and you both like the same idea- do it! You will support each other alternately and you could make more with friend support.
Try to look around you and find inspiration in references next to you. Photos from the internet are good, but it’s way better to find references in real life if you can. While working on our project we went for a bike ride to the industrial areas of our city. We collected references, made some photos, we discovered some ideas.
Alexander Kolyasa and Mark Kassikhin, Artists at Plarium Krasnodar
Interview conducted by Artem Sergeev
© a.sergeev for 80lvl, 2019. | Permalink | No comment | Add to del.icio.us
Post tags: 3d art, Cinema 4D, Game Design, gamedev, indiedev, MegaScans, quixel mixer, Substance, Substance Designer, Substance Painter, unigine
Feed enhanced by Better Feed from Ozh
Source : https://80.lv/articles/building-racers-shelter-in-unigine-001agt-002mrs-003qxl/


