Víctor Montero shared the experience of taking CGMA course FX for Games led by Fabio Silva and did a breakdown the environmental FX he worked on.
Introduction
Hey! My name is Víctor Montero. I decided to move into games development after 2 years working in the bank sector as a computer engineer. Then I studied a master in design and video game development where I realized that I needed something more artistic in my life, even if I still loved coding. Currently, I am specializing in VFX/technical art.
Goals
I was impressed with the high-end results that can be made with Unreal Engine 4. In particular, all related to shaders programming, lighting and, especially, visual effects. I tried to study with some tutorials on YouTube, listening to dev talks, reading docs… but I was feeling that I needed something more than a bunch of disconnected lessons. I was able to follow those tutorials but it was really hard for me to create my own effects. At this point, I decided to enroll in CGMA FX for Games course. Fabio M. Silva is the instructor of the course, and I couldn’t be more glad about the decision I’d made. He always gives a really good and personalized feedback on each assignment during the course.
I was wondering how the whole process of FX creation works. As a VFX artist, you need to have a huge range of skills like modeling, unwrapping, texture creation, shaders, animation, code… My main goals were to improve my knowledge of the visual effects and understand in depth the pipeline, as well as improve my weaker skills.
Environmental FX
The last assignment of the course was the production of all environmental effects for a level. It took 3 weeks to complete the task. Firstly, I analyzed the level and gathered references for what I wanted to create. Before, I put some place-holders on the level and adjust the light of the environment. Once I verified that everything was working as intended, I started to create all the effects.
I tried to create a quiet, desolated and sad mood. The original environment was inspired by an Italian village, with a warm light. I tried to transport it to somewhere in the north of Europe. The first step was to change the environment to misty weather, greyish sky and drizzling.
The atmosphere is mainly created with both fog and rain effects, plus with a huge change in the lighting. Rain is a really common effect in video games or movies because it is really easy to transmit feelings with it.
Note: The level has been created by Matima Studio, you can check it here.
Fog
The fog is created by two particle emitters. The first creates the dense fog, and the second one gives detail and movement to the effect.
For the dense fog, in the material shader, change the material domain to “Volume” and blend mode to “Additive”. I created a volume by a “Sphere mask” and multiplied by a grayscale texture to avoid fully spherical shapes. Then multiply by Dynamic Parameter to control the opacity in the particle emitter. Finally, the particle system feeds up with this material. I used the “Initial location” to set fog near the water.
The second emitter adds details of cloud shapes and movement to the effect. Here, I’ve used alpha erosion in order to achieve a smooth fading in and out of these clouds. To do that, I used a dynamic parameter and interpolated between [-1,0]. Then added this value to the opacity channel.
This emitter creates the effect of moving clouds faking animation of the fog with “Initial velocity”. For the alpha erosion, use the “Dynamic” module in the particle emitter. I wanted to control the visibility of the clouds during their lifetime, so I used the Curve editor inside Cascade to manage it.
Rain
As always, there are a lot of ways to face the creation of an effect. I just decided what was better – in my case, a big particle emitter for the raindrops and several small emitters for water splashes and ripples.
The rain effect itself doesn’t have anything fancy. It’s created by spawning several water drops that have been created with a simple dot texture and small distortion around. As there are too many elements, it becomes necessary to change the type data to “GPU Particles” in the particle emitter. This means that the calculation of this effect is handled by the graphics card instead of the CPU. This is mandatory in this kind of effects. To do that, just right click on the grey area of the particle emitter and go to Type Data/”New GPU Sprites”.
For the impact, I created a splash from a 4-frames animated hand-drawn texture synchronized with the ripples, a simple circular texture which raises its size while being more invisible. The ripples are also created by 4 images, but not animated, randomly selected and also masked with a panning noise to avoid repetition.

In order to achieve the motion in the particle emitter, one needs to change “Interpolation Method” to “Linear blend” in the Required Module/Sub UV and set the number of rows and columns of the flipbook (2-2 in my case). Then add “SubImage Index”, select “Distribution Float Constant Curve” in the distribution, and assign at least 2 points in the curve. As this is a really short animation (0.3 seconds) I left it as linear with just two points.
The level has so many places with different shapes where I had to put this impact that I decided to expose the location and frequency of this effect to parameters. This means I can adjust each effect on each place. For example, the stairs have one emitter on each step. At the same time, I also needed to cover larger areas.
To do that, in the emitter, you have to select on each module that you need to be exposed to editing in the level in order to receive a “parameter” input. This way, each module receives the values when it is set up in the level.
Fire


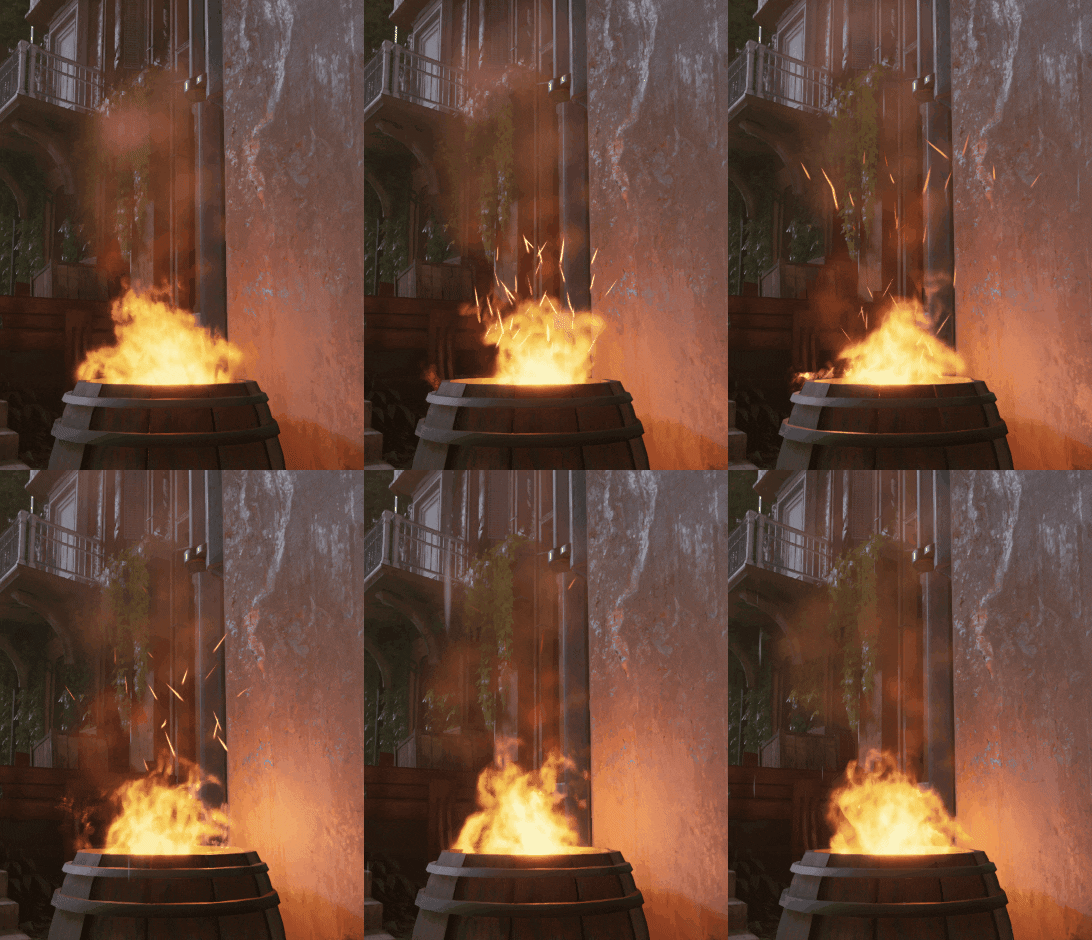
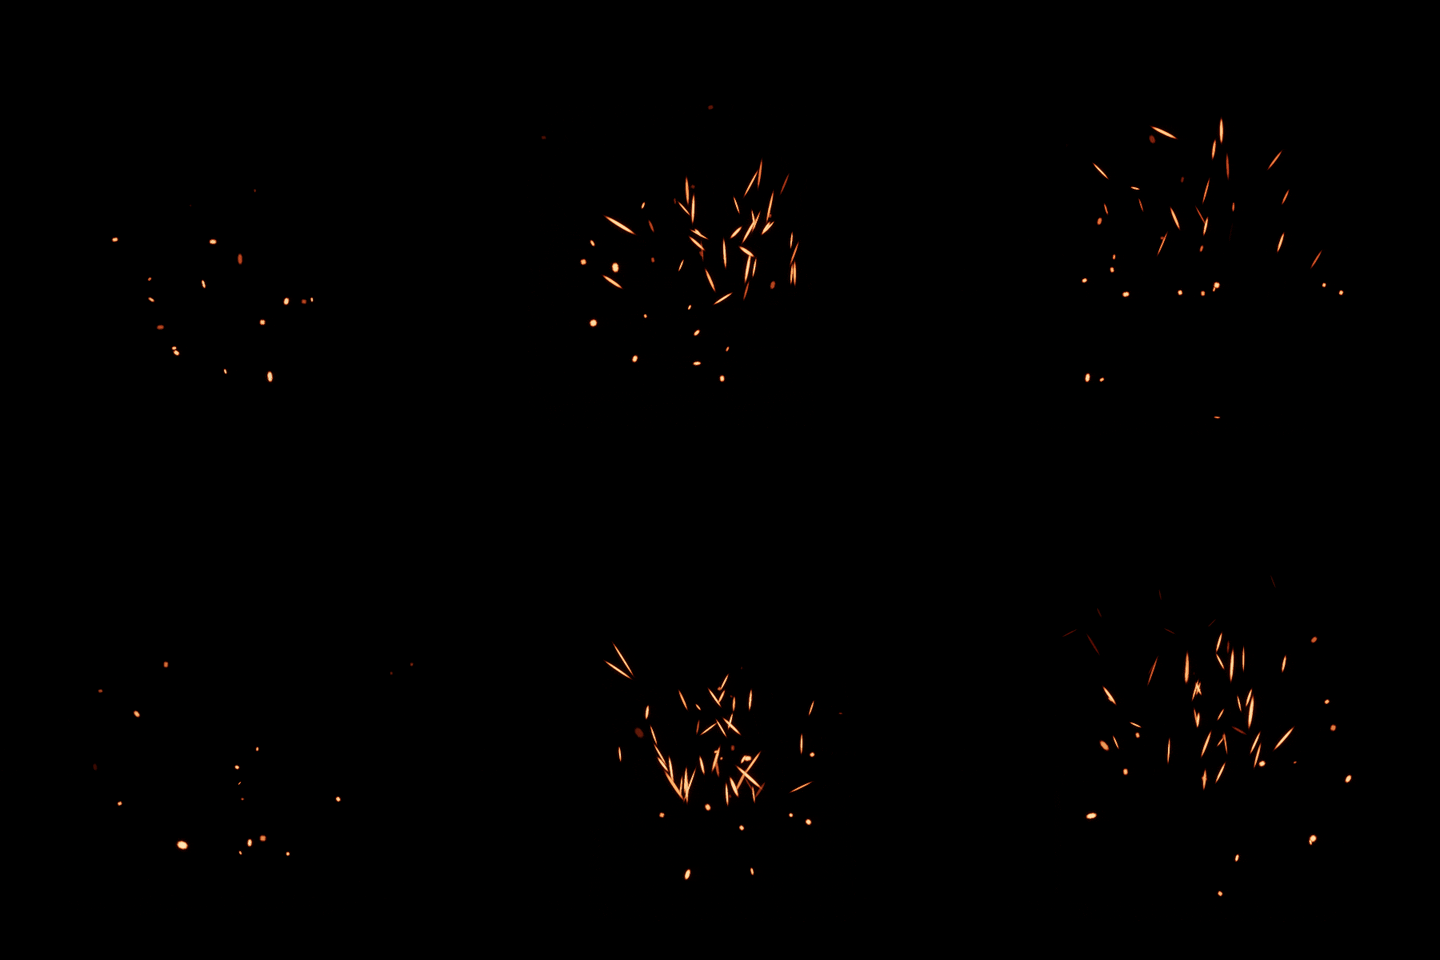
The movement is produced in the particle system with “Initial velocity”. I use a distribution vector uniform with higher values on the Z-axis in order for it to move upwards. The module “Orbit” creates a chaotic movement around the Y-axis and rotates in all directions. The module “Drag” makes the embers reduce their acceleration. So, as the embers get altitude the speed decreases.
I used two emitters, one spawning at a constant rate and the second in burst mode. Both are a dot texture but the burst one is stretched by velocity.
As for the hit around, there is a node to set this up in Unreal material editor called “Refraction”. I feed it with a circular gradient texture as an alpha of the interpolation between two values. This effect’s very expensive for the graphics cards, so it’s really important to disable it when it’s out of the range. I achieve this by implementing LODs when the camera is far from the effect and I completely removed this emitter inside the particle system.
Butterflies
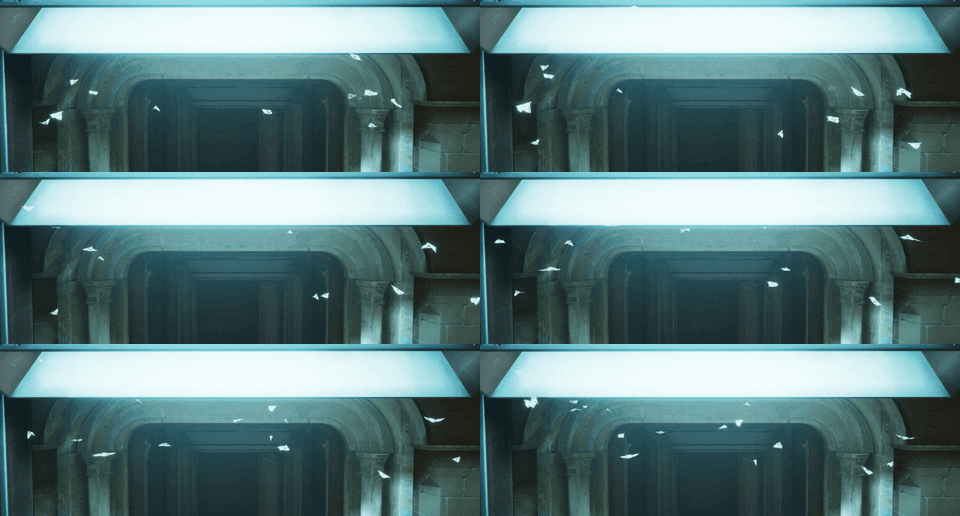
To create this effect I tried a new approach. I used meshes witch vertex animation.
This technology has been used in several games to animate a high number of assets without the need to use classic skeletons. I first learned about it from a talk by one of the tech artists of the game ABZU. They used vertex animation (together with other techniques) to animate hundreds of fish that, with the traditional approach, would have been impossible to move in real-time. They explain it way better than I do, so if you are interested here is the video:
Recapping, with this technique I baked the position of each vertex over time into two textures, one for normals and the other for UVs. These textures are read by the engine and the world offset position for each pixel of each frame. There is a tool included in the engine to create these textures (Vertex Animation Tool, provided by Epic Games). You can use this script in 3ds Max. Here you can find the information on how to use and set it up in Unreal.
In the gif below you can see how everything looks once I have the mesh and textures integrated into the engine. First, it’s only the animated planes, then I plug the mask and emissive. Next, I create different material instances for butterflies, moth, and birds changing just the images and the speed parameter.
In the material, I created a dynamic parameter that assigns random values in the particle system. This prevents all instances from moving together at the same time.

Raindrops on the Windows
This effect is not created during the course, but it’s a good example of how the theory which was explained in the course could be applied to create your own effects.

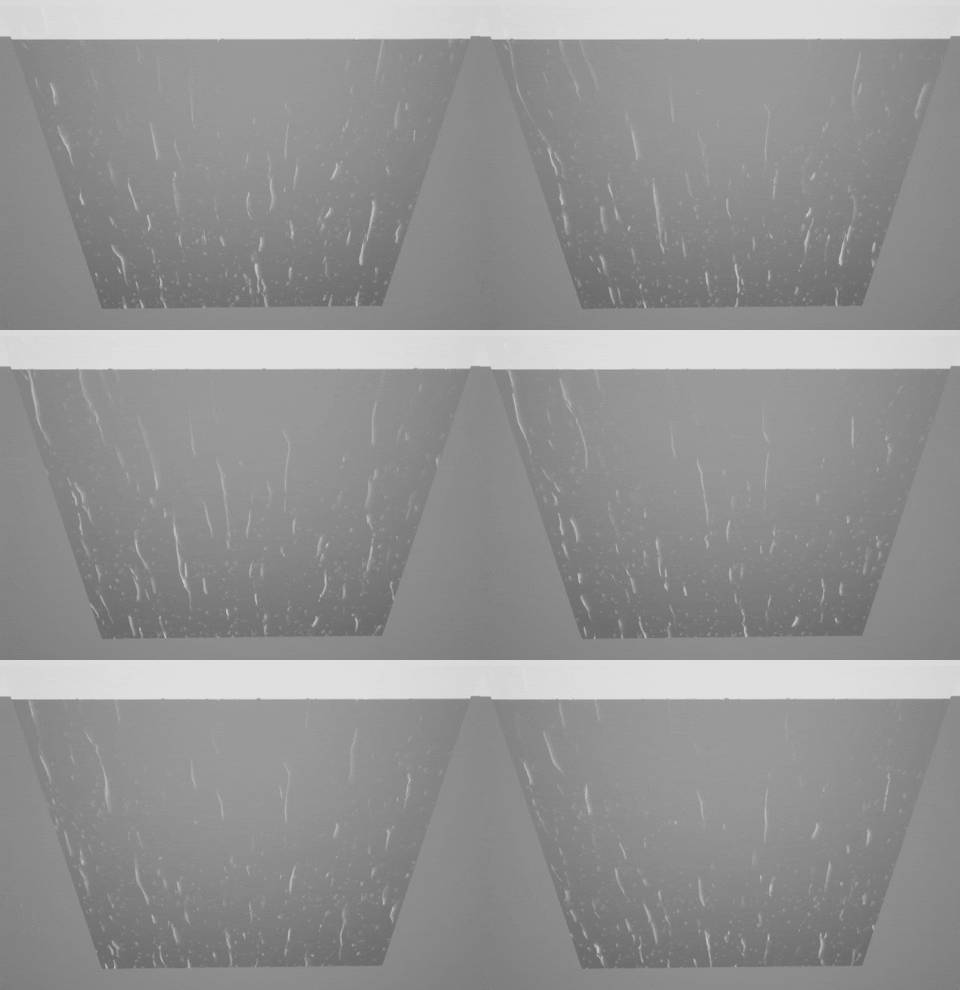
There’s nothing fancy, I just combined two animated textures with different speeds to create the effect of water falling. Also, a cloud noise works as a mask to show or hide some of the pieces of the effect. To achieve the refraction near the edges, I use a Fresnel function.
Feedback
The course provided a deep understanding of the overall VFX creation as well as taught me a useful workflow to create my own effects. The content of the course is really useful, but the live QA sessions were the best part of the course. Receiving direct feedback from an industry veteran is priceless.
The biggest difficulty for me was the creation of textures for the effects as I wasn’t familiar with tools like Photoshop. But I learned how to create my own textures and optimize them for VFX – make them tileable, pack textures, generate noise, etc.
If you’re new to VFX, you are going to spend a lot of time tweaking the effects (and I advise you to do so). It surprised me how much time I needed to achieve the look I wanted. Besides, you’ll need to learn many new tools, so don’t be afraid of playing with them to improve your workflow and achieve better results.
Learning Houdini might be a good complement to this course. It is a powerful tool that can help you to enhance the quality of your effects and it’s becoming a standard in the industry. Lastly, I would suggest to check out www.realtimevfx.com forum. There is a growing community that is sharing knowledge, discussing, and providing good feedback and advice.
Links:
- Artstation
- Twitter: @VMonty
Víctor Montero, VFX Artist
Interview conducted by Daria Loginova
For more information on CG Master Academy and the FX for Games course, please visit the CGMA website, or email 3d.registration@cgmasteracademy.com.
© Daria for 80lvl, 2019. |
Permalink |
No comment |
Add to
del.icio.us
Post tags: 3d art, CGMA, environmental fx, fog, FX, gamedev, indiedev, rain, UE4, VFX
Feed enhanced by Better Feed from Ozh
Source : https://80.lv/articles/005cg-cgma-student-project-environmental-fx/


