Adam Jarosz and Michał Mierzejewski talked about their project Abandoned Factory Buildings, a realistic environment created with the help of photogrammetry. The scene can be purchased on UE4 Marketplace.
Introduction
Hi! We are Adam Jarosz and Michał Mierzejewski from Poland. We currently work in studio The Farm 51 on the Chernobyliteproject (made in UE4). We both have over 7 years of experience, we have been working together for 4 years on such projects as GetEven (PC/PS4/xBox), Chernobyl VR Project (Ocullus, HTC Vive) and the mentioned before, Chernobylite (PC).
We complement our competences and our cooperation at work was so good that we decided to do an after-hours project. We have always seen the future in photogrammetry and we had a lot of experience with it so we decided to use it. Abandoned Factory Buildings is a scene based on photogrammetric scans, which we would like to share with you. We will try to present you our approach to the topic of using scans in real-time.
Responsibilities
Adam: I build levels, make them look great and work perfectly. I’m someone between Level artist/Level Design and Technical. I devote a lot of attention to lighting. For this project, I also keep the whole project concept, materials, and marketing stuff.
Michal: I’m 3D Artist with photogrammetry skills and my main goal is to prepare the optimal photorealistic game ready assets. For this project, I did all photogrammetry scans and almost all 3D models.
Approach to Photogrammetry
Michal: My approach to photogrammetry is simple – just scan the world! I take my digital camera with me everywhere – the scene we created was based on my photo database taken, among other things, during family walks.
Currently, photogrammetry has become a standard, but when I started to experiment with it in 2014, it wasn’t so popular, there were a few information, tutorials – I learned everything on my own mistakes. As you know, photogrammetry gives excellent results but also has its limits – such as equipment, skills, patience and many calculations.
At The Farm 51, I take pictures mainly with the Nikon D7500 but I also work with a high-class Faro Focus laser scanner. I’m responsible for the current environment pipeline in Chernobylite project – from scan to the final model.
Privately I use a cheap Nikon D3400 mainly with Nikkor 35mm and my favorite universal Tamron 17-50 mm bright lens. I always take photos in manual mode to have full control. After scanning session, I take references and photos for textures. The scanned object should have the “character” – the right amount of details because it is easier to clean the scan than to add details that will look realistic.
Because working with scans needs dealing with a huge amount of data, the organization is very important. The structure/nomenclature of our library should be standardized with preview miniatures.
I have to admit that I really like working in terrain, it is a great detachment from office everyday life. It is also a perfect excuse to stay in nature and visit interesting places. For example, because of photogrammetry, I visited Chernobyl for more than 11 times.
Dealing with Lighting and Shadows in the Photos
Adam: From the perspective of the level, the main problem with scans may be sharp shadows burned on albedo textures. We simply can’t afford it. If the source material is bad, it is usually much more smart to do it again than try to save it at any price.
However, when it comes to micro-shadows, you can fight with it or you can use it wisely. A small number of such shades will provide us with a detail that is very difficult to create from the light in the engine or it is a very expensive production. I use a lightmass in the UE4 which allows drawing huge details comparable to that found in photogrammetry. This is not a 100% PBR approach but it provides us unprecedented quality compared to standard pipelines. To show that it works, we wanted to create a day and night scene.
When it comes to how specular works on a level, the most challenging is the proper setup of light, roughness, post processes and the sky itself. Only a proper balance of all these parameters ensures a real feeling of the level. The right reference database helps in it. I was inspired by Tim Simpson‘s approach who additionally collects qualitative references for other projects. This makes it very easy to determine the design framework, which is very important while working after hours. You need to know when to tell yourself enough.
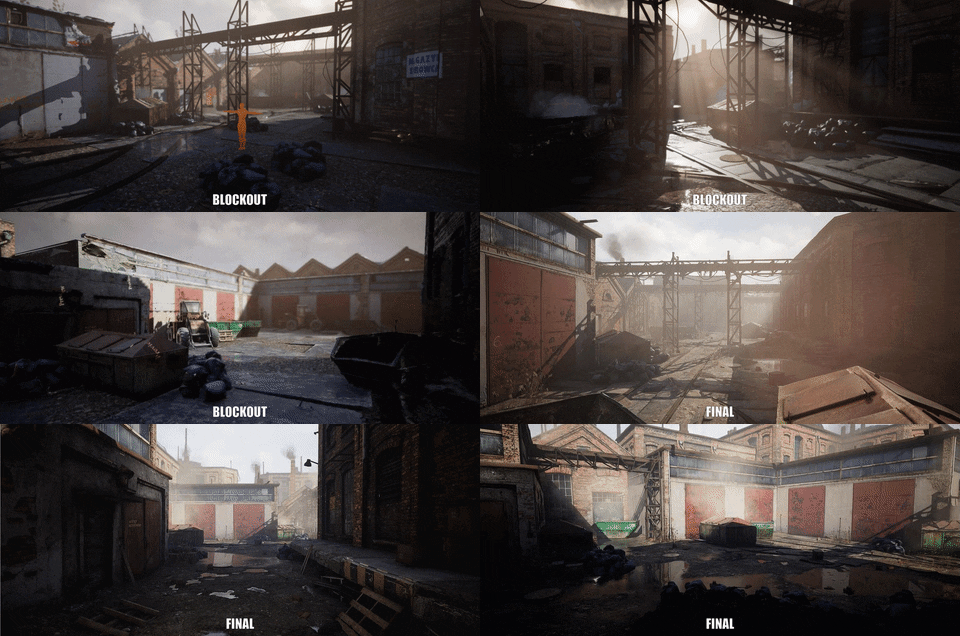
A good idea for level design has a huge impact on the final effect. At this stage, already on the first blockouts, I had base lighting and the entire level structure. In some aspects, it helped a lot that for the blockout we had a decimate elevation and props models.
Michal: When we scan objects such as containers, wrecks and even entire buildings, it is not possible to do it indoors.
When we work outside, the weather can be our greatest supporter but also an enemy. The cloudy day is perfect. In scanned rooms, you can cover windows and use several sources of artificial lighting. I also like to work with flash lamps with diffusers – then the scanning process is very efficient and the shadows are leveled.
Of course, I always work with RAW image format – photo processing is another easy way to get rid of light-shadows in Lightroom. Removing shadows is sometimes a very time-consuming process, often requiring manual tweak. The better the input material is the easier it is to achieve a good end result. As said, sometimes it is not worth improving something and if we have the opportunity to repeat the scanning process to save time, we do it.
Cleaning Scanned Assets
Michal: For scans, I use Capturing Reality. If RAW scan requires it I clean it and then retopo (I prefer manual but sometimes automatic also works), UV and bake texture in Marmoset. Then come texture tweaks (I also usually generate a normal map from albedo and mix it with the normal map from the scan to increase the amount of small detail), the final fixes and model is in the engine.
At the beginning of the process, besides HP, I prepare its decimated version with one small texture – it is a whitebox that has the scale and orientation of the final model. With this decimate model we can start to quickly prototype the level and draw conclusions whether the scan is useful or not.
Modular pieces:
Working on the Materials
Adam: When it comes to working with materials, we should mention the approach to roughness texture. A lot of people asked us what pipeline we used to create such a real material. Beauty lies in simplicity. I created a very simple material which, in the old way, transforms the R albedo channel into roughness. In the material, you can also control the brightness, contrast, invert and the ability to upload your own roughness. A suitable setup does this for 90% of assets on stage.
We kept such an order that at any time we could control most of the assets globally.
From my perspective, I prefer to stick to simple materials and edit all assets as easily as possible until the end of the project. Plenty of complex materials take time and unnecessarily complicate the editing at the moments when quick iterations matter. I create more complicated functions at the very end of the project in the last final touch.
Puddles
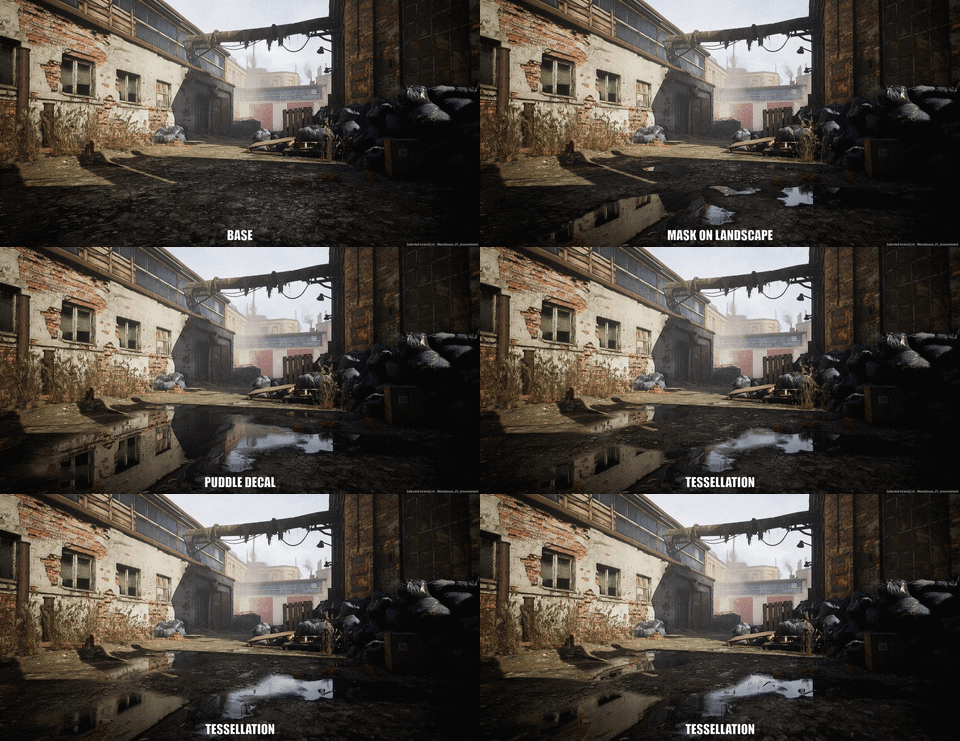
Adam: Exactly as with the materials, I was also guided by simplicity here. Simple use of the differential cloud and converting it to normal map + height map + mask gave me a very clean and sufficiently diversified base.
Everything is connected to one landscape material with tile in world space. I used an additional decal puddle to cross the diversity. In the end, the effect is complemented by the tessellation of the height map of pebbles, which perfectly pierces the edges of the puddles.
The basic condition for the puddles to be visible in the scene is the balance between the brightness of the sky and the rest of the environment.
Making Small Props
Michal: Small elements such as bricks are always scanned on the turntable – apart from single bricks, I also prepare some sets of them. Types of assets as bricks, stones or debris can by only decimated to a satisfactory number of triangles, but personally, I prefer manual retopology. We should be careful here – too much simplification in geometry can lose the natural irregularity of such objects, so everything has to be in balance – the number of polygons in relation to the final effect. In the end, it’s worth to remember to generate automatic LODs in the UE4.
We should also remember that even if we scan something, we don’t need to have one unique object – as in the case of a palette – it was enough to separate several boards to get a lot of meshes.
Challenges
One of the problems we faced was how to maintain the level of detail present on scans within the entire scene. We rebuilt the scene several times before we thought “that’s it”. With scans as placeholders, it was easy to jump into the complexity of the scene and have a preview of how it would look like later.
Combining real scans and models made traditionally was also not an easy thing to do. We often created textures from our own photos and went away from hyper-realism to get a more game-like product.
Finally, we were just two people. We had to deal with the topics previously unknown to us. We really wanted to create something that in our opinion is lacking in games. The time that others devote to films, serials, and games was devoted to this project. It was awesome not to work alone as together, we stayed motivated. In the end, it was also helpful to post on the forums or FB groups like 80lv Show and Tell.
Adam Jarosz & Michał Mierzejewski, 3D Artists
Interview conducted by Kirill Tokarev
Building facades for all seasons with Quixel:
© Daria Loginova for 80lvl, 2019. |
Permalink |
No comment |
Add to
del.icio.us
Post tags: 3d art, environments, gamedev, indiedev, materials, Photogrammetry, photorealistic, photoscans, realistic, UE4
Feed enhanced by Better Feed from Ozh
Source : https://80.lv/articles/photogrammetry-in-environment-design/


